Creating and Connecting to A HeatWave MySQL Always Free Instance
MySQL HeatWave MySQL Oracle Cloud

Oracle Cloud Infrastructure (OCI) has a very robust always-free tier. Oracle recently announced that HeatWave MySQL will now be part of that offering. As part of the always-free tier, we can set up one instance and a single-node HeatWave Cluster. In this post, we will show how to spin up that instance and connect to it using a Compute instance.
Prerequisites
In order to follow along with this demo, you will need the following:
- An OCI account.
- If you do not have an account, you can create one here.
- MySQL Shell installed.
- You can download MySQL Shell here.
Configuring the VCN for MySQL
When you create an OCI account, a virtual cloud network (VCN) is created for you. The VCN consists of two subnets. One subnet is ‘public,’ which means it can be accessed from the internet, and the other is ‘private,’ which means it can only be accessed from inside OCI.
When we set up our always-free HeatWave MySQL instance, we will place it in the private subnet and the Compute instance in the public subnet. In order to connect to the MySQL instance, we need to add an ingress rule to the private subnet in the VCN.
After logging in to OCI, click the ‘hamburger menu’ in the upper left corner.

In the search box that appears, type ‘vcn’ (1) and then click the ‘Virtual cloud networks’ link (2).

Click the link for the VCN we want to update. Here I am using the zoid_vcn VCN.

Once on the VCN Details page, scroll down to the list of subnets and click the link for the ‘private’ subnet. Here, I am using private_subnet-zoid_vcn.

On the Subnet Details page, scroll down to the ‘Security Lists’ section and click the link for the security list you want to update.

When we reach the Security List Details page, scroll down to the section labeled ‘Ingress Rules’ and click the Add Ingress Rules button.

On the ‘Add Ingress Rules’ form, add 10.0.0.0/24 as the Source CIDR (1), and make sure the IP Protocol is set to TCP (2). Set the Destination Port Range to 3306,33060 (3). You can add an optional comment (4).

When you are done, click the ‘Add Ingress Rules’ button.

We should now see two new rules on the Ingress Rules list—one for port 3306 and one for port 33060.

HeatWave MySQL Instance
Now that we have the VCN configured, let’s spin up a new HeatWave MySQL instance.
Go ahead and click the hamburger menu again.

In the search form, enter ‘mysql’ (1), and click the ‘DB Systems HeatWave MySQL’ link (2).

Click the ‘Create DB system’ button on the DB Systems page.

On the ‘Create DB System’ form, make sure you click ‘Always Free’ in the top right corner.

In the ‘Provide DB system information’ section, give the new instance a name (1). You can also provide a description of the instance.

For the ‘Create administrator credentials’ section, provide the name of the admin user for the MySQL instance (1) and the user’s password (2), and then confirm the password (3).

For this demo, we are going to keep the placement configuration as the default. In my case, the availability domain will be AD-3 (1) in my region.

We can only select ‘Standalone’ (1) in the next section since high availability is not enabled in the always-free tier. In the ‘Configure networking’ section, choose your VCN (2) and then select the private subnet (3).

In the ‘Configure Hardware’ section, we will not make any changes but note the information about the shape of the HeatWave MySQL instance (1), the HeatWave Cluster configuration (2), and the storage size (3).

Note the values for the backup plan (1). While automated backups are enabled by default, each automated backup is only kept for one day. Finally, click the ‘Create’ button (2).

We should now see a screen letting us know that the HeatWave MySQL instance is being created.

Compute Instance
The HeatWave MySQL instance will spin up in a few minutes. While that is happening, let’s set up our Compute instance. Click the hamburger menu again.

In the search form, enter ‘compute’ (1) and click the ‘Instances Compute’ link (2).

Click the ‘Create Instance’ button on the Compute Instance list page.

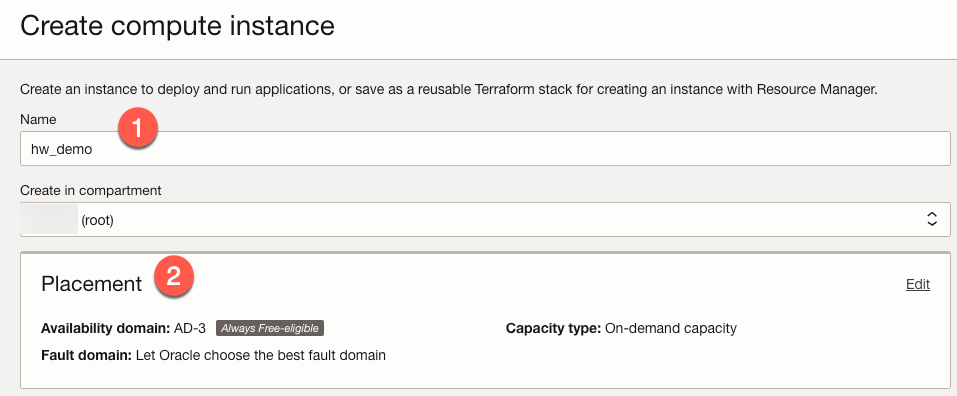
In the ‘Create compute instance’ form, give the instance a name (1) and note the placement in the availability domain (2).

We will keep the default image (1) and shape (2) for this demo. If you wish to change either of these (for example, you may want to create an ARM instance), click the ‘Edit’ link (3). Also, note that the subnet that is chosen is our public subnet (4). Using this subnet is necessary to access this compute instance over the internet.

Next, we need to add SSH keys so that we can connect to the server over SSH. Choose whatever option suits your needs. If you generate a key pair, download the private key so you can use it to access the server.

We will keep the defaults for the Boot volume and then click the ‘Create’ button.

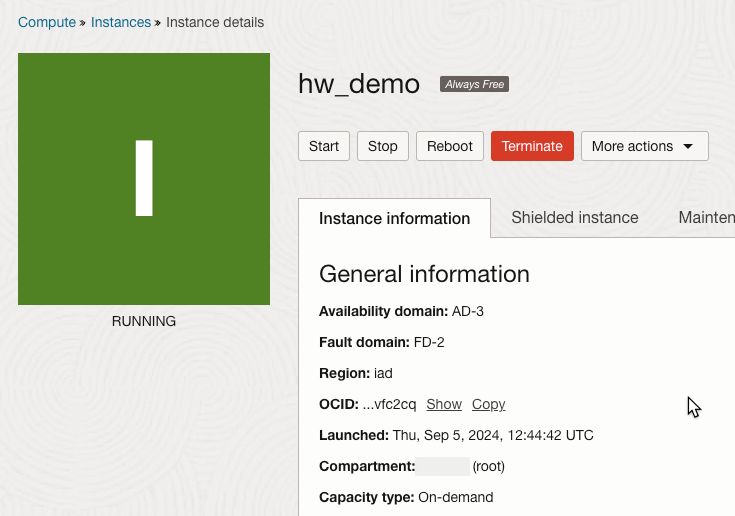
Compute instances take little time to spin up. In a few minutes, we should see that our instance is running.

Connecting to HeatWave MySQL
By now, our HeatWave MySQL instance should be running, and the details page should resemble the image below.

We need to use MySQL Shell now to connect to the HeatWave MySQL instance by going through the Compute instance. We need to connect to the Compute instance using SSH. Thankfully, this is relatively simple to do with MySQL Shell. The command will be similar to:
mysqlsh --ssh opc@{host address} --ssh-identity-file {path to key} {db user}@{HeatWave MySQL IP address}:33060
Let’s break down the parts of this command.
--ssh- This option tells MySQL Shell we want to connect to a MySQL instance usingssh.opc@{host address}- The username and host address of the SSH server we wish to connect to.- The
{host address}is the public IP address of the compute instance we created.
- The
--ssh-identity-file {path to key}- This option tells MySQl Shell what private key to use.- If you generated a key pair,
{path to key}should be the full path to the downloaded private key.
- If you generated a key pair,
{db user}@{HeatWave MySQL IP address}:33060- The connection information for the HeatWave MySQL instance.{db user}- The admin user we provided when we created the MySQL instance.{HeatWave MySQL IP address}- The private IP address for our HeatWave MySQL instance.- Note that we need to provide a port number when connecting over SSH. In this example, I used port
33060which will connect using the X-Protocol.
After running this command, MySQL Shell will be connected to the new HeatWave MySQL instance.

Wrap Up
The ‘Always Free’ tier of Oracle Cloud now includes a HeatWave MySQL instance and a single node HeatWave Cluster. The size and shape of this instance are beefy enough to run small databases or to let you try HeatWave MySQL before needing to purchase bigger shapes or more storage. While HeatWave MySQL instances are not given a public IP address, we can connect to these instances over SSH using a compute instance as a ‘go between’. If you would like to learn more about HeatWave MySQL, check out this web page.
Photo by Lance Grandahl on Unsplash

