Running Drupal using Always Free Resources in Oracle Cloud
MySQL HeatWave MySQL Oracle Cloud Drupal

Oracle Cloud Infrastructure (OCI) has a very robust always-free tier. Oracle recently announced that HeatWave MySQL will be part of that offering. This post will show how to set up a free Drupal site using Always Free resources in Oracle Cloud.
Prerequisites
To follow along with this demo, you will need the following:
- An OCI account.
- If you do not have an account, create one here.
- MySQL Shell installed.
- You can download MySQL Shell here.
- You should have completed the steps to create Always Free Compute and HeatWave MySQL instances as outlined in this blog post.
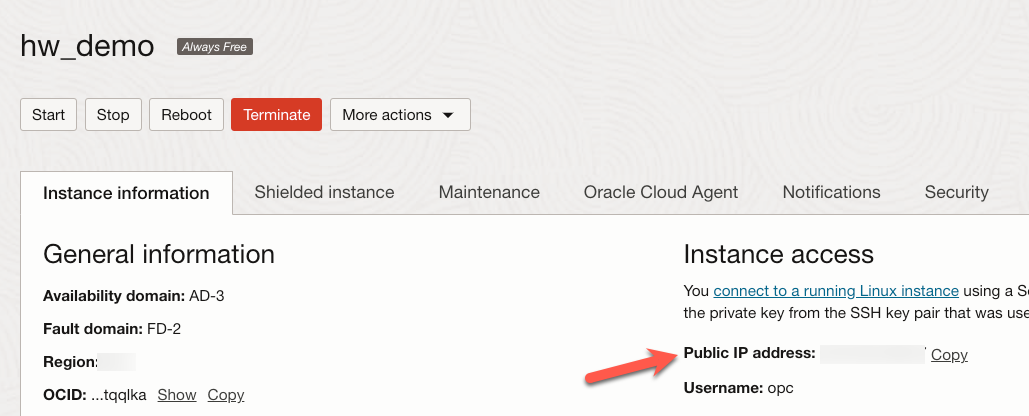
Note the Public IP address of the Compute instance.
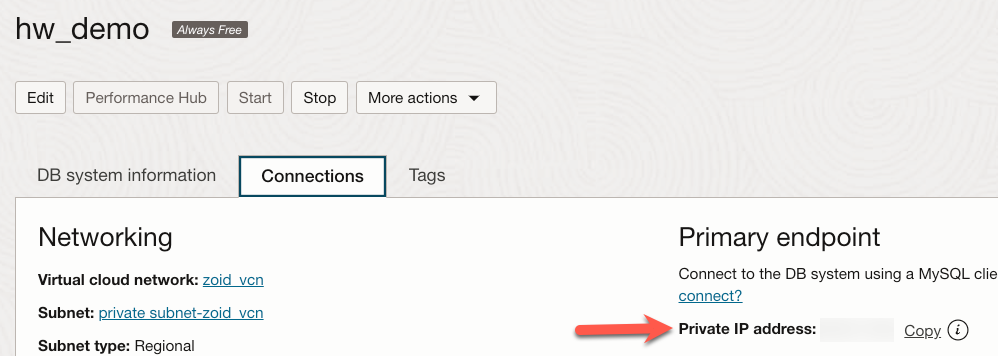
Lastly, we will also need the private IP address for the HeatWave MySQl instance.
Updates to VCN
Before we begin, we need to change the ingres rules in the public subnet of our Virtual Cloud Network (VCN) to allow web traffic into our Compute instance.
After logging in to OCI, click the ‘hamburger menu’ in the upper left corner.

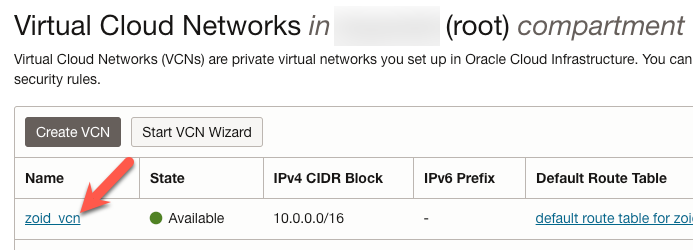
In the search box that appears, type ‘vcn’ (1) and then click the ‘Virtual cloud networks’ link (2).

Click the link for the VCN we want to update. Here, I am using the zoid_vcn VCN.
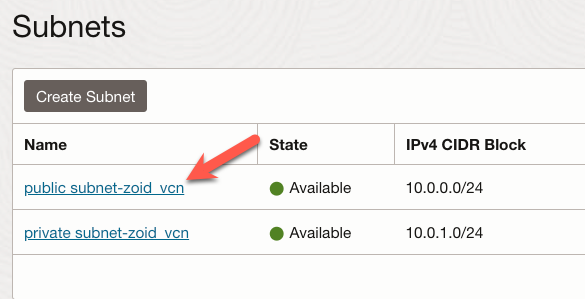
Once on the VCN Details page, scroll down to the list of subnets and click the ‘public’ subnet link. Here, I am using private_subnet-zoid_vcn.
On the Subnet Details page, scroll down to the ‘Security Lists’ section and click the link for the security list you want to update.

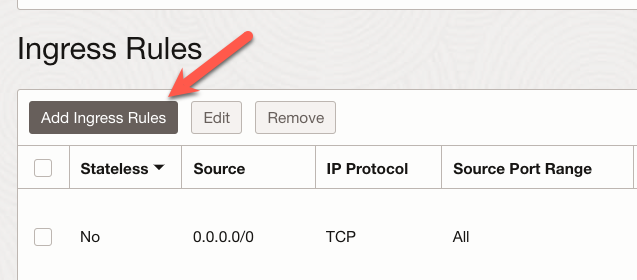
When we reach the Security List Details page, scroll down to the section labeled ‘Ingress Rules’ and click the Add Ingress Rules button.
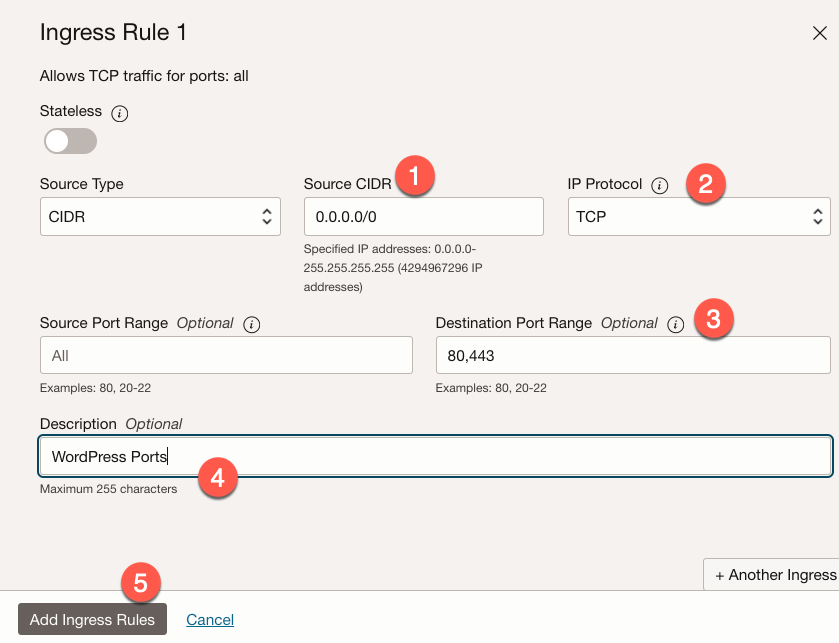
On the Add Ingress Rules form, specify the CIDR as 0.0.0.0/0 (1) - this CIDR will allow traffic from any IP address. Ensure the ‘IP Protocol’ is TCP (2) and specify ports 80 & 443 in the ‘Destination Port Range’ (3). You can add an optional comment (4). When you are done, click the ‘Add Ingress Rules’ button (5).
When the ingress rules have been added, they should be listed under the Ingress Rules section of the Security List details page.

Prepping the Database
We must prep the HeatWave MySQL instance by adding the schema we will use for our Drupal site.
The command to connect to the HeatWave MySQL instance resembles:
mysqlsh --ssh opc@{host address} --ssh-identity-file {path to key} {db user}@{HeatWave MySQL IP address}:33060
Let’s break down the parts of this command.
--ssh- This option tells MySQL Shell we want to connect to a MySQL instance usingssh.opc@{host address}- The username and host address of the SSH server we wish to connect to.- The
{host address}is the public IP address of the compute instance we created.
- The
--ssh-identity-file {path to key}- This option tells MySQl Shell what private key to use.- If you generated a key pair,
{path to key}should be the full path to the downloaded private key.
- If you generated a key pair,
{db user}@{HeatWave MySQL IP address}:33060- The connection information for the HeatWave MySQL instance.{db user}- The admin user we provided when we created the MySQL instance.{HeatWave MySQL IP address}- The private IP address for our HeatWave MySQL instance.- Note that we must provide a port number when connecting over SSH. In this example, I used port
33060which will connect using the X-Protocol.
After running this command, MySQL Shell will be connected to the new HeatWave MySQL instance.

After we are connected to our HeatWave MySQl instance, we run the following command to create a new database schema for this demo.
\sql create schema wp_demo;
With the new schema completed, we can use \q to exit from MySQl Shell.
Prepping the Compute Instance
Now, we need to prepare our Compute instance to install Drupal. Using the private key we specified/created when we spun up the instance, connect over SSH using a command similar to the one below.
ssh ssh opc@{public IP address} -i {path to private key}
The {public IP address} is the public IP address for our Compute Instance, and the {path to private key} is the absolute path to the private key on our system.
If you have not connected to this instance previously, you will be asked to verify if you want to connect and add the key fingerprint to the list of known hosts. The screen may resemble the following image.

Updating the System
Whenever I spin up a new Compute instance, I like to ensure everything is up to date. For this demo, we can run the following command.
sudo yum update
This command may take a while to complete depending on the version of Linux you chose when you created the Compute instance.
Installing Apache
We can use Apache or Nginx with WordPress. I will use Apache for this demo because I am more familiar with it.
Apache can be installed by running the command:
sudo yum install -y httpd
To enable and start the Apache HTTP Server, we use the command:
sudo systemctl enable httpd --now
Open Local Firewall Ports
Earlier, we set up ingress rules for ports 80 and 443 to allow web traffic into our public subnet. However, we must still open those ports in our Compute instance.
To open port 80 on our Compute instance, we run the following command:
sudo firewall-cmd --permanent --add-port=80/tcp
Opening port 443 can be accomplished by using this command:
sudo firewall-cmd --permanent --add-port=443/tcp
Once we have configured our rules for the local firewall, we need to reload them to start allowing traffic on those ports.
sudo firewall-cmd --reload
Installing PHP
The latest version of Drupal requires at least PHP version 8.3. The steps below demonstrate how to install PHP 8.3 on a compute instance.
First, we need to enable EPEL and install the Remi PHP repository.
dnf install https://dl.fedoraproject.org/pub/epel/epel-release-latest-8.noarch.rpm
sudo dnf install https://dl.fedoraproject.org/pub/epel/epel-release-latest-8.noarch.rpm
sudo dnf install https://rpms.remirepo.net/enterprise/remi-release-8.rpm
sudo dnf module switch-to php:remi-8.3
Finally, we install PHP and some necessary modules.
sudo yum install php php-cli php-common php-curl php-gd php-mbstring php-mysql php-xml -y
When the installation has finished, we should verify that the correct version was installed using the following command.
php -v
The output of this command should resemble the text below.
PHP 8.3.14 (cli) (built: Nov 19 2024 15:14:23) (NTS gcc aarch64)
Copyright (c) The PHP Group
Zend Engine v4.3.14, Copyright (c) Zend Technologies
With PHP and our modules installed, we need to restart Apache.
sudo systemctl restart httpd
Testing
Before moving on, let’s create a simple PHP page to test that everything works as expected.
I will use Nano, but you can use any method to create a file.
sudo nano /var//www/html/test.php
Add the following text to the file and save the file.
<?php
phpinfo();
?>
Now, open a web browser and navigate to http://{Public Ip address of Compute instance}/test.php. If everything is set up correctly, you should see a page that resembles the image below.

If you are curious, take a look at the information that is available on the page.
Installing Composer
The recommended installation method for Drupal uses Composer, a dependency manager for PHP. Let’s examine the commands necessary to install Composer.
First, we download the latest version of Composer to the server.
php -r "copy('https://getcomposer.org/installer', 'composer-setup.php');"
Next, we verify that the installer’s SHA-384 hash is valid.
php -r "if (hash_file('sha384', 'composer-setup.php') === 'dac665fdc30fdd8ec78b38b9800061b4150413ff2e3b6f88543c636f7cd84f6db9189d43a81e5503cda447da73c7e5b6') { echo 'Installer verified'; } else { echo 'Installer corrupt'; unlink('composer-setup.php'); } echo PHP_EOL;"
If we see a message that states Installer verified! we can now run the installer.
php composer-setup.php
After the installation is completed, we remove the installer.
php -r "unlink('composer-setup.php');"
Currently, the Composer executable is only available in the directory in which we ran the commands above. To make this available globally, run the following command:
sudo mv composer.phar /usr/bin/composer
You can choose to move the file to any directory in your PATH.
Now, let’s verify the version of Composer by running the command below.
compser -v
The results should resemble the text below. You may also see text below this in the output.
   ______
  / ____/___  ____ ___  ____  ____  ________  _____
 / /   / __ \/ __ `__ \/ __ \/ __ \/ ___/ _ \/ ___/
/ /___/ /_/ / / / / / / /_/ / /_/ (__  )  __/ /
\____/\____/_/ /_/ /_/ .___/\____/____/\___/_/
                    /_/
Composer version 2.8.4 2024-12-11 11:57:47
Installing Drupal
To install the core Drupal files, we run the following command.
composer create-project drupal/recommended-project drupal_demo
To make things a little easier to configure, let’s copy the files in the drupal_demo directory to the Apache root.
sudo cp -a drupal_demo/. /var/www/html/
Next, let’s set the permissions on the files we just moved.
sudo chcon -t httpd_sys_rw_content_t /var/www/html -R
sudo setsebool -P httpd_can_network_connect 1
Updating Apache settings
Before we start our installation, let’s make some updates to our Apache config so the site displays as we expect it to when it is installed.
I am going to open the config file using Nano with the following command:
sudo nano /etc/httpd/conf/httpd.conf
Look for a block of text that resembles:
<Directory "/var/www/html">
    #
    # Possible values for the Options directive are "None", "All",
    # or any combination of:
    #   Indexes Includes FollowSymLinks SymLinksifOwnerMatch ExecCGI MultiViews
    #
    # Note that "MultiViews" must be named *explicitly* --- "Options All"
    # doesn't give it to you.
    #
    # The Options directive is both complicated and important. Please see
    # http://httpd.apache.org/docs/2.4/mod/core.html#options
    # for more information.
    #
    Options Indexes FollowSymLinks

    #
    # AllowOverride controls what directives may be placed in .htaccess files.
    # It can be "All", "None", or any combination of the keywords:
    #   Options FileInfo AuthConfig Limit
    #
    AllowOverride All
And change AllowOverride from “None” to “All” and save the file.
Next, restart Apache.
sudo systemctl restart httpd
Configuring Our Setup
After Apache is restarted, open a web browser to http://{Public IP address}/web and we should see the first screen of the configuration process. I will choose “English” and click “Save and continue”.

On the next screen, we select an installation profile. I will choose “Standard” and click “Save and continue”.

On the next page, we will see information about our system. In this case, we have one warning that we will ignore (1). Scroll down to view more information and then click the “continue anyway” link (2).

On the “Database configuration” page, enter the schema we created above (1), the username we used when creating the HeatWave MySQL instance (2), and the password for that user (3). Then, click the “Advanced options” link (4) and enter the private IP address for our HeatWave MySQL instance (5). Then scroll down and click “Save and continue.”

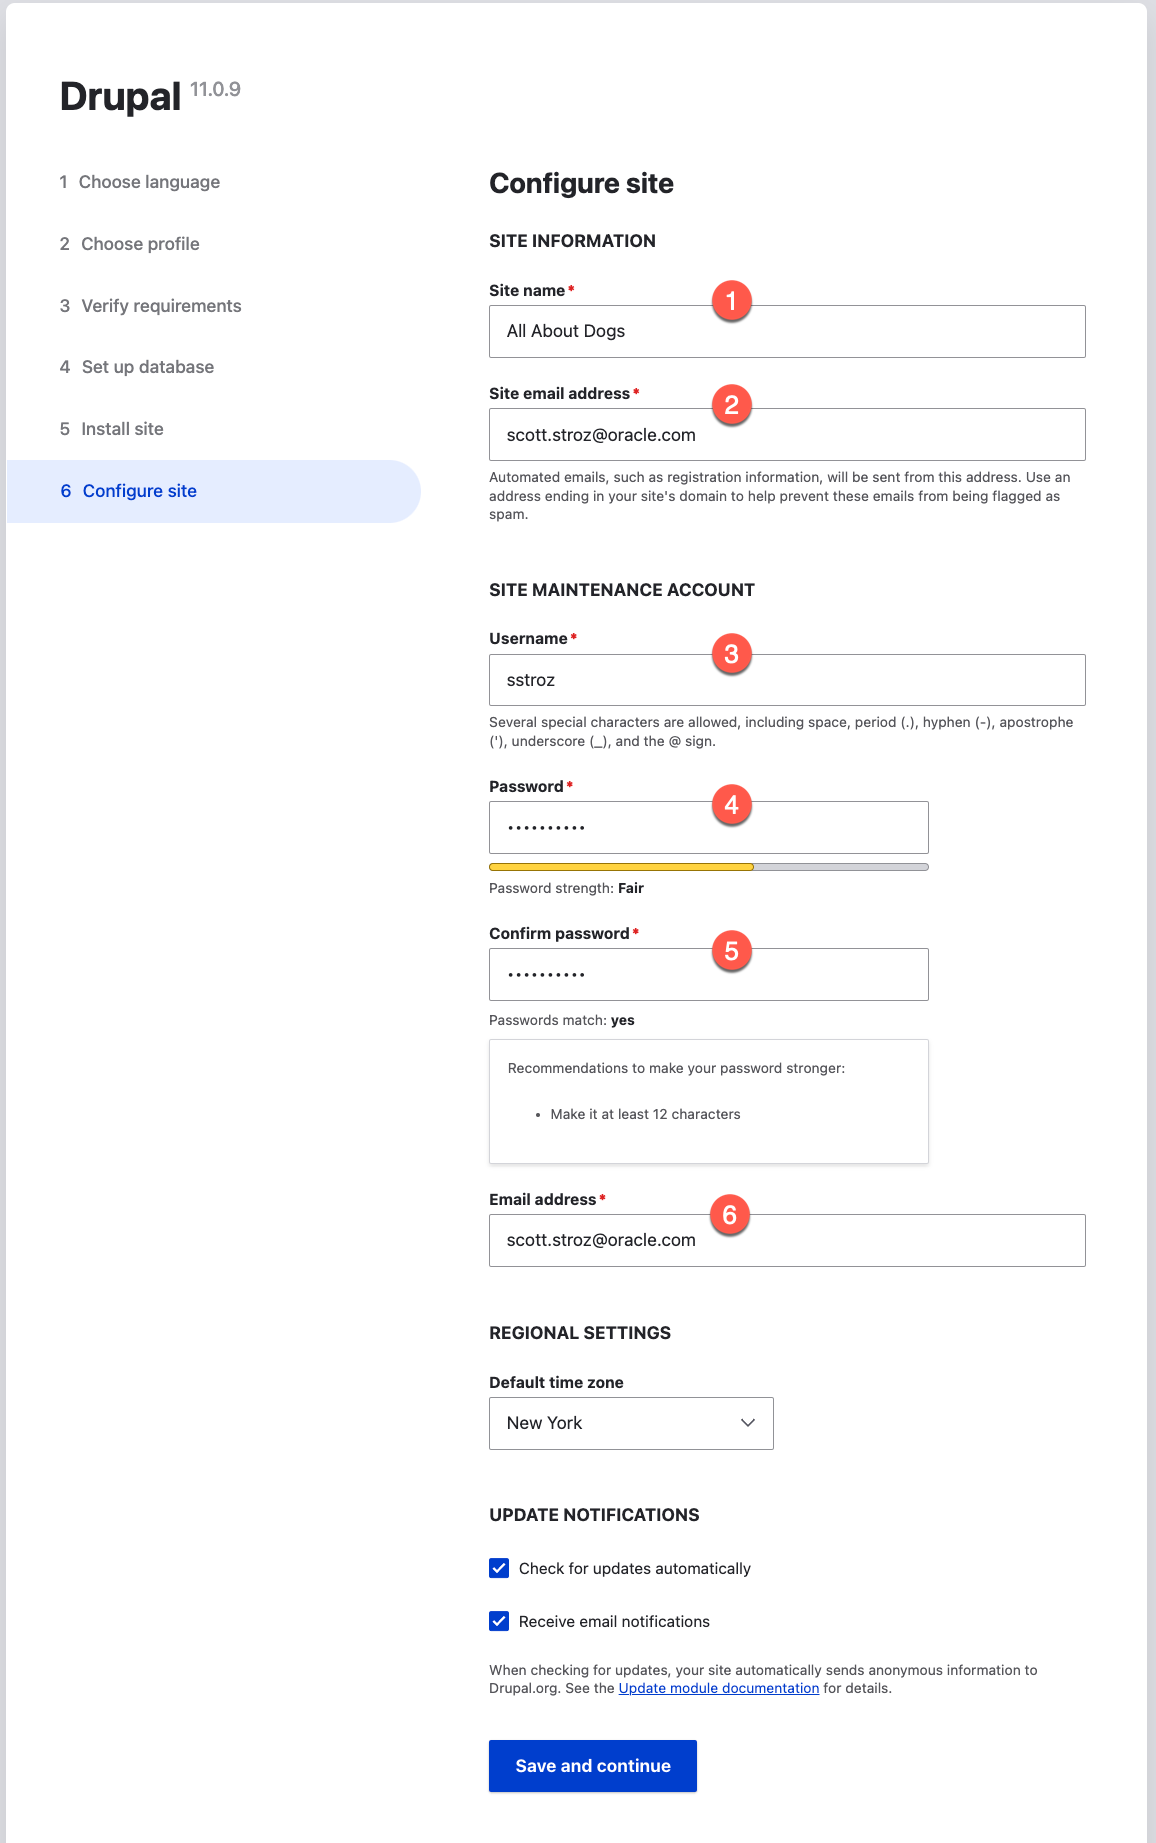
After the site is installed, we will add some configuration settings. I name the site “All About Dogs” (1) and provide my email address (2). I provide a username (3) and password (4) and confirm the password (5) - Make sure you use a strong password. I add my email address for the user (6) and then click “Save and continue”.
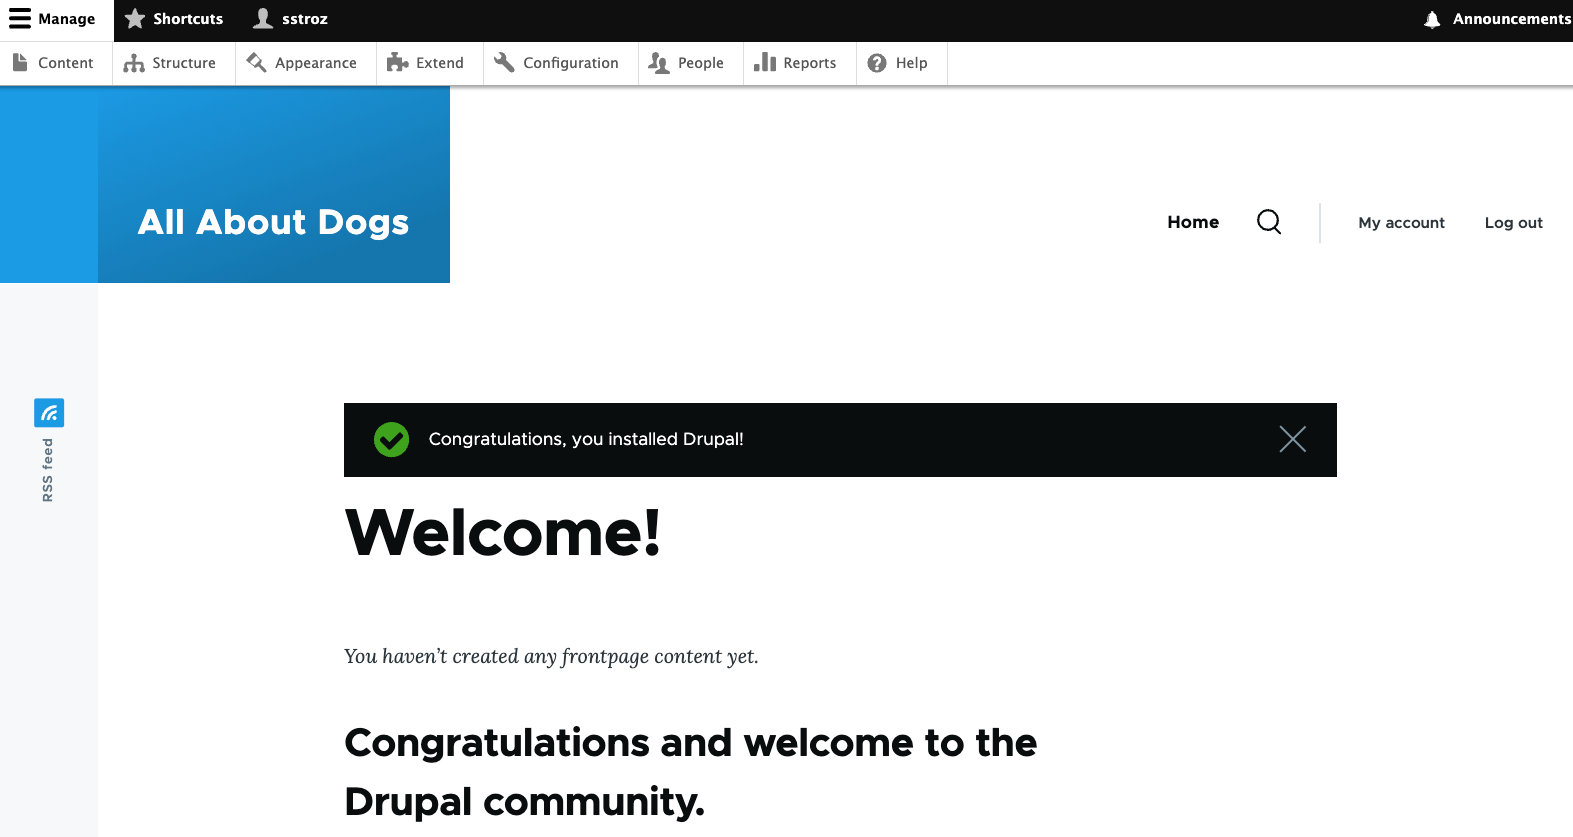
We should see the main Drupal page when the installation process is complete.
Next Steps
The next steps for running the Drupal site are outside this post’s scope. They include, but are not limited to:
- Registering a domain name (if you do not already have one)
- Configuring Apache to use your domain name
- Get SSL certificates and configure Apache to use them.
Wrap Up
Drupal is one of the most popular content management systems (CMS) on the Internet. By combining an Always Free Compute instance with an Always Free HeatWave MySQL instance, you can get a Drupal site up and running on an architecture you control without having to pay any hosting fees.

