Testing MySQL Applications With Java and Testcontainers

Over the years, I have become obsessed with writing code tests. One big pain point with writing tests is testing code that interacts with a database. In this post, we will talk about some of the difficulties encountered when writing tests for database interaction and how we can use Testcontainers to mitigate those issues.
The Issues
On one project I worked, the development team (about 15 of us) shared a dev database…yeah, I know…ew.
There are quite a few issues with this setup when writing tests for code that will interact with a database.
- Running tests that insert data would cause those test inserts to be visible to every other developer.
- This could lead developers to think there are issues with their code, as they may see unexpected results.
- A developer working on a new DDL script could ‘break’ the database for everyone else.
- This happened more times than I care to remember.
The solution put into place before I joined the project was only marginally better - we ran all of our tests for database interactivity against an H2 database. While this addressed many issues we encountered, it caused other issues. For example, the version of H2 we were using did not support stored procedures or custom/stored functions. So, if we needed to write a new stored procedure or custom/stored function, we could only test that the testing framework threw a particular error.
It would have made everyone’s life easier if we ran our tests against the same database system the project used. For various reasons, standing up copies of the database in our development environment was not an option. So, we were left with the less-than-ideal architecture that had been cobbled together over a few iterations of the codebase.
A Solution
If I had known about Testcontainers, I would have lobbied to allow us time to implement a testing architecture that would make everyone’s lives easier. So, what is Testcontainers? The ‘official’ description from the website states:
Testcontainers is an open-source framework for providing throwaway, lightweight instances of databases, message brokers, web browsers, or just about anything that can run in a Docker container.
More simply, Testcontainers allows developers to spin up Docker images for testing purposes. The framework can be used for a variety of scenarios. Still, we will focus on using Testcontainers for testing interaction with MySQL. For this post, we are using the Java MySQL module using JUnit 5 to run our tests.
Before We Get Started
Before we get started, you need to have the following installed:
- Docker - Or a Docker equivalent such as Rancher or Podman. I am using Rancher on my machine.
- Check out the documentation on setting up other container runtimes.
- An IDE that can handle Java code (I use IntelliJ IDEA).
- Git - This will be the best way to get the demo up and running quickly.
Getting the Code
To get the code in this demo, head over to this GitHub repo and clone it.
The command to clone the repo from the command line over SSH is:
git clone git@github.com:boyzoid/java-testing-testcontainers.git
Once you have cloned the repo, open the project in your IDE.
Code Overview
We should now have a directory structure that looks like the following:
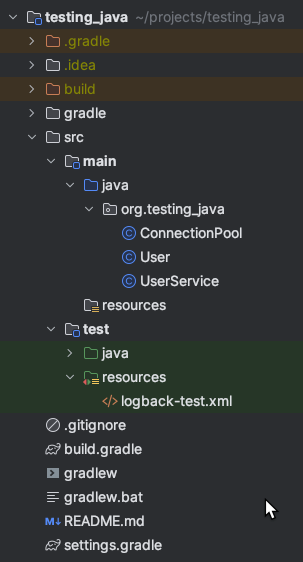
Let’s talk about the files/directories used in this demo.
- The
src/main/java/org/testing_javadirectory contains the main application classes.ConnectionPool.javais a Java class that manages connections to the database.User.javais a Java class that represents a User object.UserService.javais a Java class responsible for managing Users.
- The
src/main/test/java/org/testing_javadirectory contains our single test class, ’ UserServiceTest.java`. - The
src/main/test/java/org/testing_java/utildirectory contains a Java class used to make repetitive tasks in testing easier.
If you take a peak inside build.gradle, you will see dependencies used fore this demo.:
 dependencies {
    testImplementation 'org.junit.jupiter:junit-jupiter-api:5.8.1'
    testImplementation 'org.junit.jupiter:junit-jupiter-engine:5.8.1'
    testImplementation "org.testcontainers:testcontainers:1.19.3"
    testImplementation "org.testcontainers:junit-jupiter:1.19.3"
    testImplementation "org.testcontainers:mysql:1.19.3"
    testImplementation 'ch.qos.logback:logback-classic:1.3.14'
    implementation 'mysql:mysql-connector-java:8.0.33'
    implementation 'com.zaxxer:HikariCP:5.1.0'
}
We have dependencies for JUnit 5, Testcontainers, the MySQL J connector, and Hikari - which we will use for connection pooling.
Deeper Dive Into The Code
Let’s take a deeper dive into the different pieces of this code.
The Tests
Since it is the focus of this demo, let’s look at the UserServiceTest class first.
I won’t go over every line in this class. I’ll touch on the relevant bits.
First, when we define our class, we use a couple of annotations.
@Testcontainers
@TestMethodOrder(MethodOrderer.MethodName.class)
class UserServiceTest {
  ...
}
The first annotation is used to signify that the tests will be using Testcontainers. The second tells JUnit to run the tests alphabetically by method name.
Inside our class, we initialize some variables that our tests will use.
 @ClassRule
static MySQLContainer<?> mySQLContainer = new MySQLContainer<>("mysql:latest");
This line creates a static variable that is an instance of a MySQLContainer from Testcontainers. The @ClassRule annotation tells JUnit that this single instance should be used for the entire class and not instantiated for each test.
After this, we define a few more variables we will use during our tests.
static UserService userService;
static ConnectionPool connectionPool;
static TestUtils testUtils;
We then have a method with the @BeforeAll annotation. The code in this method will be run only once for the entire class.
@BeforeAll
static void startDb() throws SQLException {
    mySQLContainer.start();
    String url = mySQLContainer.getJdbcUrl();
    connectionPool =  new ConnectionPool(url, mySQLContainer.getUsername(), mySQLContainer.getPassword());
    testUtils = new TestUtils(connectionPool);
    testUtils.setUpData();
    userService = new UserService( connectionPool);
}
In this method, we first call mysqlContainer.start() to start the Testcontainer. Once the container is started, we can get the information needed to connect to the MySQL database. We call mySQLContainer.getJdbcUrl() to get the URL. We create a new instance of ConnectionPool using this URL and the username and password we get from calling mySQLContainer.getUsername() and mySQLContainer.getPassword(), respectively.
We use the ConnectionPool instance to create an instance of our TestUtils and then call setUpData() on that instance.
Lastly, we create a new instance of UserServive and pass in connectionPool.
Our following method, stopDb(), is annotated with @AfterAll which means it will be run after all tests in the class are run. In this method, we call mySQLContainer.stop() to shut down the Testcontainer.
@AfterAll
static void stopDb(){
    mySQLContainer.stop();
}
Now, we will look at the three tests in this class. To indicate to JUnit that these methods are tests, we annotate them with @Test.
The first test checks to make sure that mySQLContainer is running.
@Test
public void containerRunning(){
    assertTrue(mySQLContainer.isRunning());
}
The next test, getUser(), verifies that we receive the correct User object from userService.getUser() for a given id.
@Test
public void getUser() throws SQLException {
    User testUser = testUtils.getRandomUser();
    User user = userService.getUser(testUser.getId());
    assertEquals(testUser.getId(), user.getId());
    assertEquals(testUser.getName(), user.getName());
}
First, we set testUser to a random user selected from the database (We will get into that code below). Then, we use the id from that User to call userService.getUser(). The result of this call is set to the variable named user. We then use two assertions to test that the id and name properties of testUser match the id and name properties of user.
I could have hardcoded an id value in this test, but I prefer not to use hardcoded values in tests when it can be avoided. Using the id from a random user ensures that this test will pass as long as the id value exists in the database.
Our last test is used to verify that we can insert a User into the database.
@Test
public void createUser() throws SQLException {
    String testName = testUtils.getRandomString(10);
    User testUser = new User(testName);
    User newUser = userService.createUser(testUser);
    assertNotNull(newUser.getId());
    User user = testUtils.getUserById(newUser.getId());
    assertEquals(testName, user.getName());
}
In this test, we first grab a random string from testUtils. This value will be used as the name property for the new User. We then set testUser as a new User and pass the random string we retrieved. At this point, the id property will be null. Next, we call userService.createUser() and pass in testUser. We set the variable newUser to the result of userService.ceateUser(). This user instance will have the id that is returned. Once we have the new User, we verify the id property is not null and then use the id property to fetch the User from testUtils. Yes, we could have called userService.getUser() here, but if there is an issue with that method, then we are using multiple userService methods in a single test, and that means we are technically testing more than one piece of functionality at a time. Mocking the data won’t work here either because we need to verify that the data was written to the database. Our last assertion verifies that the value of the name property returned from teh database matches our random string.
The Service
Let’s take a look at the UserService class.
We have a single private variable named connectionPool, and our constructor accepts an instance of ConnectionPool and sets it to this private variable.
private final ConnectionPool connectionPool;

public UserService(ConnectionPool connectionPool) {
    this.connectionPool = connectionPool;
}
Then, we have two methods, getUser() and createUser(). Let’s break down getUser() first.
public User getUser( int id) throws SQLException {
    try{
      Connection connection = this.connectionPool.getConnection();
      String query = "SELECT id, name FROM user WHERE id = ?";
      PreparedStatement pstmt = connection.prepareStatement(query);
      pstmt.setInt(1, id);
      ResultSet rs = pstmt.executeQuery();
      rs.next();
      User user = new User(rs.getInt("id"), rs.getString("name"));
      connection.close();
      return User;
    }
    catch(SQLException e){
        throw new SQLException(e);
    }
}
This method accepts an int as the id argument and returns a User object. The first line of code gets a database connection from our connection pool (We get to more details on how that works in a bit). The following line of code defines our query string. Note that the query ends with ?. This character is used to parameterize our query to help mitigate SQL injection attacks. Once we have our query, we call connection.prepareStatement() to create a prepared statement. Next, we set the value of our parameter using pstmt.setInt(). We get a ResultSet by calling pstmt.execute() and then call rs.next() to get the result we are looking for. Now that we have our result set, we create a new User instance and use the result set’s id and name properties. We then close the connection and return the newly created User.
Now, let’s look at the createUser() method.
public User createUser(User user) throws SQLException {
    try{
        Connection connection = this.connectionPool.getConnection();
        String query = "INSERT INTO user (name) VALUES (?)";
        PreparedStatement pstmt = connection.prepareStatement(
                query,
                PreparedStatement.RETURN_GENERATED_KEYS
        );
        pstmt.setString(1, user.getName());
        pstmt.executeUpdate();
        ResultSet rs = pstmt.getGeneratedKeys();
        if(rs.next()){
            user.setId(rs.getInt(1));
        }
        else {
            throw new SQLException("Failed to create user");
        }
        connection.close();
    }
    catch (SQLException e){
        throw new SQLException(e);
    }
    return User;
}
The createUser() method uses very similar syntax for getting the connection and setting the query and the parameters, with one big difference. When we create the PreparedStatement, we pass in another argument, PreparedStatement.RETURN_GENERATED_KEYS. Usually, when inserting data, there is no result set returned. This argument specifies that any new ids' created due to theinsertshould be returned as part of the result set. Another difference is that we callpstmt.executeUpdate(). We then retrieve the generated keys from the prepared statement, get the value from the first item in the set, and set theidproperty of theuserobject. We close the connection and, finally, return theuser.`
The Connection Pool
In each of the last classes, we used ConnectionPool. Let’s take a closer look at that class.
We are using Hiakri to handle our JDBC connection pooling, so we must import those classes and the Connection class.
import com.zaxxer.hikari.HikariConfig;
import com.zaxxer.hikari.HikariDataSource;
import java.sql.Connection;
We have a single private variable named ds, an instance of HikariDataSource.
private final HikariDataSource ds;
Our constructor accepts three arguments - a JDB URL, the database user, and the password for the database user.
public ConnectionPool(String url, String username, String password) {
    HikariConfig config = new HikariConfig();
    config.setJdbcUrl(url);
    config.setUsername(username);
    config.setPassword(password);
    config.setMaximumPoolSize(10);
    this.ds = new HikariDataSource(config);
}
We use these arguments to populate an instance of HikariConfig and set ds to a new instance of HikariDataSource using this config.
The other method we have in this class is getConnection(). This method returns a connection from our connection pool.
public Connection getConnection() {
    try {
        return ds.getConnection();
    } catch (Exception e) {
        throw new RuntimeException(e);
    }
}
The Test Utilities
The last class wqe will look at is TestUtils. This a class that contains helpers for running tests. I will use a class like this to generate random strings or numbers. I also use this class for methods that will help retrieve or create test data. In this example, we have a method that sets up the database with a table named user and then populates the table with some test data. This process is essential because, by default, the MySQL database in our Testcontainer will be empty.
Let’s look at the setUpData() method.
public void setUpData() throws SQLException {
    String createUserSql = "create table if not exists user (id int auto_increment primary key, name varchar(20) null);";
    String insertUserSql = "insert into user(name) values('Fred'), ('Lenka'), ('Scott')";
    try{
        Connection connection = this.connectionPool.getConnection();
        Statement createStatement = connection.createStatement();
        Statement insertStatement = connection.createStatement();
        createStatement.execute(createUserSql);
        insertStatement.execute(insertUserSql);
        connection.close();
    }
    catch (SQLException e){
        throw new SQLException(e);
    }
}
We create two queries, one to create the table and one to insert data. In some applications, these may be managed by database migration tools. We instantiate two statements from the connection, execute those statements and close the connection.
We have two methods for getting data form this table. They are getRandomUser() and getUserById(). These use a similar syntax to what we have seen above to get a random user from the database and get a user based on the value of the id column.
public User getRandomUser() throws SQLException {
    String query = "select id, name from user order by rand() limit 1";
    try{
        Connection connection = this.connectionPool.getConnection();
        Statement stmt = connection.createStatement();
        ResultSet resultSet = stmt.executeQuery(query);
        resultSet.next();
        User user = new User(resultSet.getInt("id"), resultSet.getString("name"));
        connection.close();
        return User;
    }
    catch(SQLException e){
        throw new SQLException(e);
    }
}

public User getUserById( int id) throws SQLException {
    try{
        Connection connection = this.connectionPool.getConnection();
        String query = "SELECT id, name FROM user WHERE id = ?";
        PreparedStatement pstmt = connection.prepareStatement(query);
        pstmt.setInt(1, id);
        ResultSet rs = pstmt.executeQuery();
        rs.next();
        User user = new User(rs.getInt("id"), rs.getString("name"));
        connection.close();
        return User;
    }
    catch(SQLException e){
        throw new SQLException(e);
    }
}
The last method in this class retrieves a random string of a given length. We used this in UserServiceTest to generate a random name for a new user.
public String getRandomString(int length){
    return RandomStringUtils.randomAlphabetic(length);
}
Running the Tests
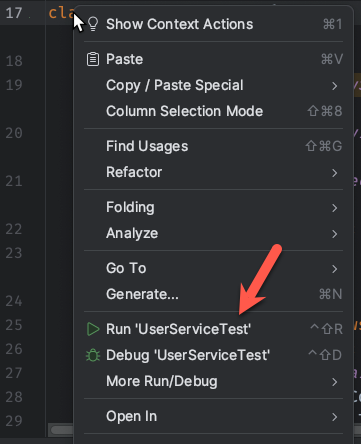
Most IDEs will have a way to run your tests easily. IntelliJ IDEA usually has a green ‘play button’ in the left gutter (for some reason, I could not figure out, these were missing when I was grabbing the screenshots). In IDEA, you can also right-click the class and select Run 'UserServiceTest' to run all the tests.
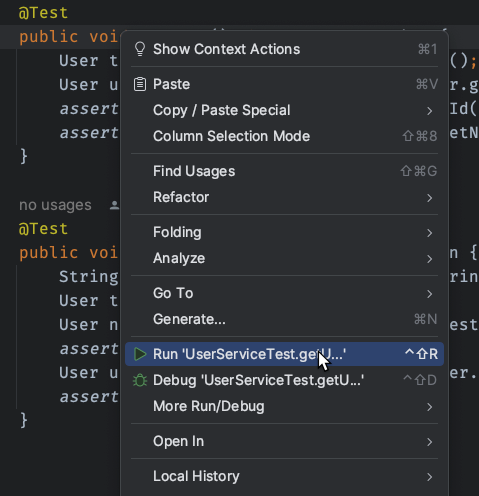
You can right-click a test method to run a single test and choose Run 'UserServiceTest.{method name}'.
When I run the entire class of tests, I will see some logging in the console followed by:
BUILD SUCCESSFUL in 10s
4 actionable tasks: 2 executed, 2 up-to-date
12:27:51 PM: Execution finished ':test --tests "org.testing_java.UserServiceTest"'.
If the test fail, you will see messages here that give more details.
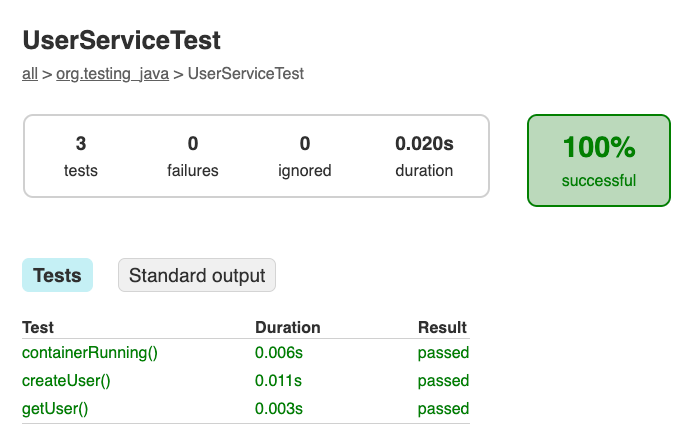
By default, JUnit 5 creates an HTML report of the last test run in /build/reports/tests/test/index.html.

If you open this file in a browser, the output is similar to the image below.
The Wrap-up
One of the most essential parts of writing code is reliably testing to ensure the code is doing what it is intended to do. When you have code interacting with a database, it can be difficult to test that code effectively. The Testcontainers framework allows developers to make it easier to test that database interactivity reliably.
Photo by Louis Hansel on Unsplash
