Capturing GPS Data on a Raspberry Pi and Storing It as JSON

In a previous post, I showed how you can install MySQL on a Raspberry Pi. In this post, I will show how to capture GPS data and store that data as JSON in MySQL Document Store.
The Hardware
I am using a Vilros starter kit that includes a Raspberry Pi 4 Model B 8Gb board, a case, and other accessories. I also ordered an Adafruit GPS Module and a USB to TTY Serial Cable. Using a USB port, the serial cable connects the GPS module to the Pi.
I asked my son to help me solder the pins to the GPS module and connected the serial cable to the following pin positions.
- Red wire to VIN
- Back wire to GND (ground)
- Green wire to Rx (receive)
- White wire to Tx (transmit)

For more information on how to attach the GPS module using the USB adapter and verify the module is working as expected, check out this link on the Adafruit website. However, anything after the “Setting up the USB Adapter” is irrelevant for this post.
The Software
I am using Oracle Linux 9 as the operating system and have installed the Innovation Release of MySQL 8.
Note: The rest of this post assumes you have followed the steps here to install Oracle Linux (OL) and MySQL on a Raspberry Pi.
Access MySQL on the Pi
We must have console access to the Pi to run the code that captures and stores the GPS data. While we could use a monitor and keyboard and connect to the Pi directly, I like having the ability to paste commands/code into the console. To do this, I prefer to connect to the Pi over SSH. The next few steps must be completed while logging into the Pi directly as root.
Create a Linux User
SSH access is enabled by default on OL 9, but root access over SSH is disabled. I prefer to use root access as little as possible, so I created a new user named scott. The command to create this new user is:
useradd scott
I then set the password for my new user with the command:
passwd scott
Add New User to sudoers
While I do not like to connect as root, I like having a user that can run commands as root using sudo. To accomplish this, we need to edit the /etc/sudoers file. I prefer nano, and because the Pi version of OL is stripped down, we need to install nano by using the command:
dnf install nano
With nano installed, we can edit the /etc/sudoers file using the command:
nano /etc/sudoers
Find the line that reads:
root ALL=(ALL) ALL
And add a line that adds the same permissions as root for the new user. In my case, the line was:
scott ALL=(ALL) ALL
To save the file press ctrl+x, enter y and press enter.
I do not suggest adding users like this on a production server, but for this example, it is acceptable.
Connect Over SSH
Before connecting to the Pi over SSH, we need to get the Pi’s IP address.
Get the IP Address
To get this information, we use the command:
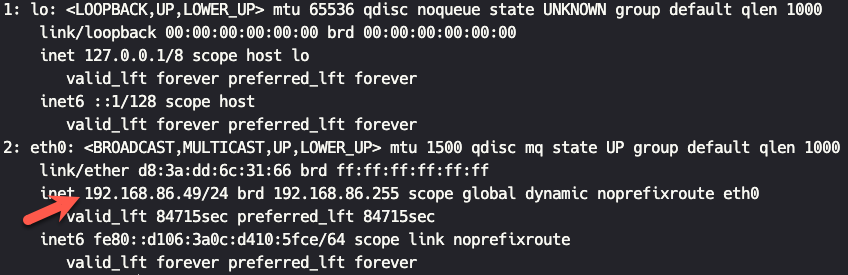
ip addr
This command will give you output that looks similar to the image below. We want to note the local IPV4 address for the eth0 connection. In my case, it is 192.168.86.49.
Connect From a Remote Computer
Using the IP address form above, we can connect to the Pi over SSH form a remote computer using the command:
ssh {user}@{ip address}
In my case, the command would be:
ssh scott@192.168.86.49
You should see something similar to the following:
The authenticity of host '192.168.86.49 (192.168.86.49)' can't be established.
ED25519 key fingerprint is SHA256:Wdb61TwTkKF6wrm/NVOjIJ7nfVizaFIGgNN5coUm3RY.
This key is not known by any other names.
Are you sure you want to continue connecting (yes/no/[fingerprint])?
Type yes, then press enter. You will be prompted for the password for your user. When you enter the password, you should be connected to the Pi.

Install MySQL Shell
MySQL Shell is a command line interface for managing MySQL instances. MySQL Shell is also the easiest way to create schemas and collections for MySQL Document Store. To install MySQL Shell, run the following command.
sudo dnf install mysql-shell -y --enablerepo=mysql-tools-innovation-community
Once MySQL Shell is installed we can connect to the Pi using the command:
mysqlsh {username}@localhost
In this case, {username} is the name of the MySQL user created in the previous post. After providing the password, you may be asked to store the password.
Once you are connected to MySQL Shell, the prompt will look similar to the picture below.

By default, MySQL Shell starts in JavaScript mode which is ideal because that is the mode we need.
Create the Document Store Collection
We must create a new schema after connecting to the MySQL instance using MySQL Shell. Let’s call this gps_demo.
session.createSchema('gps_demo')
When then tell MySQL to use the new schema by using the command:
\u gps_demo
Note the message that states the schema is accessible via a variable named db.
Finally, we will create a collection named location by using the command:
db.createCollection('location')
Install Node
Before we can go any further, we need to install Node using the following command:
sudo dnf install -y nodejs
The App
Now that we have everything we need, we can start coding the app.
Create Directory
First, we create a directory for our code. We do that with the command:
mkdir gps_demo
We then need to cd into the new directory.
cd gps_demo
Initialize Our Node App
We initialize our Node app by using the command:
npm init
This process will bring you through a series of prompts to help set up the packages.json file for our app. You can accept the defaults or make changes as you want.
Here is my package.json file after initializing the Node app.
{
  "name": "gps_demo",
  "version": "0.0.1",
  "description": "",
  "main": "index.js",
  "scripts": {
    "test": "echo \"Error: no test specified\" && exit 1"
  },
  "author": "Scott Stroz",
  "license": "MIT"
}
Let’s change this file to allow us to use import statements in our code. Use the command nano packages.json to edit the file. After the license information, add a JSON key named type and set the value to module. When you are done, the file’s content should resemble the text below.
{
  "name": "gps_demo",
  "version": "0.0.1",
  "description": "",
  "main": "index.js",
  "scripts": {
    "test": "echo \"Error: no test specified\" && exit 1"
  },
  "author": "Scott Stroz",
  "license": "MIT",
  "type": "module"
}
Install the Node Modules
Next, we install all the Node modules we need for our code. We can install these modules using the command:
npm install gps serialport body-parser @mysql/xdevapi dotenv
Here is a breakdown of these modules:
gps- Parses the raw GPS data into JSON.serialport- Reads the GPS data from a serial port.body-parser- Extracts the data from theserialportstream.@mysql/xdevapi- Connects the Node app to MySQL.dotenv- Reads environment variables.
Define Environment Variables
The following environment variables need to be defined for our code to work.
GPS_DB_USER={The database user}GPS_DB_PASSWORD={The password for the database user}GPS_DB_HOST=localhostGPS_DB_SCHEMA=gps_demoGPS_DB_COLLECTION=locationGPS_SERIAL_PORT={serial port path}
The SERIAL_PORT value is from the earlier steps, where we attached and verified the USB connection is working. It should be /dev/ttyUSB0 by default.
Create index.js
To create our application file, run the command:
nano index.js
Then, paste the following code into the file and save it.
import { SerialPort } from "serialport"
import { ReadlineParser } from '@serialport/parser-readline'
import GPS from "gps"
import * as dotenv from 'dotenv'
import * as mysqlx from '@mysql/xdevapi'
dotenv.config()

const port = new SerialPort({path: process.env.GPS_SERIAL_PORT, baudRate: 9600})
const parser = port.pipe(new ReadlineParser({ delimiter: '\r\n' }))
const gps = new GPS
let startDate = new Date()
startDate.setMinutes(startDate.getMinutes() - 1)
const connectionString = `mysqlx://${process.env.GPS_DB_USER}:${process.env.GPS_DB_PASSWORD}@${process.env.GPS_DB_HOST}:33060/${process.env.GPS_DB_SCHEMA}`
const dbCollection = process.env.GPS_DB_COLLECTION
const dbSchema = process.env.GPS_DB_SCHEMA

const pool = mysqlx.getClient(connectionString,{
    pooling: {
        enabled: true,
        maxSize: 10,
        maxIdleTime: 20000,
        queueTimeout: 5000
    }
})

console.log(startDate)

gps.on('data', async ()=>{
    let diff = Math.abs(startDate - gps.state.time)
    let sec = Math.floor((diff/1000))
    const now = new Date()
    if(sec > 30 && now.getFullYear() === gps.state.time.getFullYear()){
        startDate = gps.state.time
        const session = await pool.getSession()
        const schema = session.getSchema(dbSchema)
        const collection = schema.getCollection(dbCollection)
        try{
            await collection.add(gps.state).execute()
        }
        catch(e){
            console.log('DB Error')
        }
        session.close()
    }
})

parser.on('data', (data)=>{
    try{
        gps.update(data)
    }
    catch(e){
    }
})
Code Deep Dive
Let’s take a closer look at this code.
Imports
At the top of the file, we have all our import statements for the modules we use. We also initialize dotenv.
import { SerialPort } from "serialport"
import { ReadlineParser } from '@serialport/parser-readline'
import GPS from "gps"
import * as dotenv from 'dotenv'
import * as mysqlx from '@mysql/xdevapi'
dotenv.config()
Setting the Variables
The next block of code sets all the variables we use. Let’s take a look at each of these individually.
const port = new SerialPort({path: process.env.GPS_SERIAL_PORT, baudRate: 9600})
The port variable is an instance of SerialPort. When we instantiate this object, we pass the path, which is the value of the GPS_SERIAL_PORT environment variable and the baudRate. The USB adapter uses a baud rate of 9600.
const parser = port.pipe(new ReadlineParser({ delimiter: '\r\n' }))
The parser variable sets the pipe and passes an instance of ReadlineParser with the delimiter of \r\n. This option tells the parser that every line will be delimited with an end of line and a new line character.
const gps = new GPS
The gps variable is a new instance of GPS
let startDate = new Date()
startDate.setMinutes(startDate.getMinutes() - 1)
We set the startDate variable to the current date and then set the minutes back one minute. The code below will only save the GPS data every 30 seconds. Setting the minutes back one minute forces GPS data to be saved as soon as the app starts.
const connectionString = `mysqlx://${process.env.GPS_DB_USER}:${process.env.GPS_DB_PASSWORD}@${process.env.GPS_DB_HOST}:33060/${process.env.GPS_DB_SCHEMA}`
const dbCollection = process.env.GPS_DB_COLLECTION
const dbSchema = process.env.GPS_DB_SCHEMA
We create a variable named connectionString, which uses the environment variables for the user, password, host, and schema. We use mysqlx as the protocol and specify port 33060. These settings allow communication with MySQL Document Store using the XDev API.
We also create variables for the collection and schema names that contain values from envirnment variables.
const pool = mysqlx.getClient(connectionString,{
    pooling: {
        enabled: true,
        maxSize: 10,
        maxIdleTime: 20000,
        queueTimeout: 5000
    }
})
The pool variable is a connection pool for MySQL. We pass in the connectionString and then values that define the connection pool.
gps.on('data', async ()=>{
    let diff = Math.abs(startDate - gps.state.time)
    let sec = Math.floor((diff/1000))
    const now = new Date()
    if(sec > 30 && now.getFullYear() === gps.state.time.getFullYear()){
        startDate = gps.state.time
        const session = await pool.getSession()
        const schema = session.getSchema(dbSchema)
        const collection = schema.getCollection(dbCollection)
        try{
            await collection.add(gps.state).execute()
        }
        catch(e){
            console.log('DB Error')
        }
        session.close()
    }
})
In this code block, we set an event handler for when GPS data is parsed by the gps object.
First, we get the difference, in seconds, between startDate and the value of gps.state.time.
Next, we check if that value is greater than 30 and that the year of gps.state.time is the same as the current year. I added this because I noticed some of the data that is saved had the wrong year.
If these conditions are true, we set startDate to the value of gps.state.time. Then, we grab a session from the connection pool, get the schema from the session, and the collection from the schema.
Inside the try block, we save the GPS data by calling the add() method of the collection, passing in gps.state, and then calling execute() using method chaining. If this throws an exception, we output a message to the console.
Finally, we close the session so the connection can be returned to the connection pool.
parser.on('data', (data)=>{
    try{
        gps.update(data)
    }
    catch(e){
    }
})
This code block sets up an event handler for when the parser has parsed data from the serial port. When data is parsed, we call the update() method of the gps object and pass in the data that was parsed. The data sent from the GSP module is in a special delimited format and gps.update() will parse that data into JSON.
Run the Code
To run the app, execute the command:
sudo node index
You should see a date output to the console with no errors.
If you prefer not to run this code using sudo, you need to add your user to the dialout group using the command:
sudo usermod -a -G dialout {user}
In this command, {user} is the Linux user you want to assign to the dialout group.
Before these changes take effect, you must log out and back in again. Now, we can run the app using:
node index
Checking the Data
Let the app run for a minute or two, and then use ctrl+c to stop it. Once the app is stopped, log into MySQL Shell.
mysqlsh {user}@localhost
Here, {user} is the database user.
Then switch to the gps_demo schema using:
\u gps_demo
Next, run the command:
db.location.find()
This command should output all the JSON documents that the app has stored. The data should look similar to the following:
{
    "_id": "0000653a5454000000000000003c",
    "alt": 179,
    "fix": "3D",
    "lat": 40.814430,
    "lon": -74.078728,
    "hdop": 1.7,
    "pdop": 1.9,
    "time": "2023-10-30T12:54:17.000+00:00",
    "vdop": 0.85,
    "speed": 1.03712,
    "track": 231.21,
    "errors": 0,
    "processed": 2282,
    "satsActive": [
        30,
        20,
        15,
        13,
        23,
        5
    ],
    "satsVisible": [
        {
            "prn": 5,
            "snr": 18,
            "status": "tracking",
            "azimuth": 71,
            "elevation": 35
        },
        {
            "prn": 10,
            "snr": null,
            "status": "in view",
            "azimuth": 273,
            "elevation": 5
        },
        {
            "prn": 13,
            "snr": 20,
            "status": "tracking",
            "azimuth": 52,
            "elevation": 48
        },
        {
            "prn": 15,
            "snr": 17,
            "status": "tracking",
            "azimuth": 125,
            "elevation": 88
        },
        {
            "prn": 18,
            "snr": null,
            "status": "in view",
            "azimuth": 314,
            "elevation": 59
        },
        {
            "prn": 20,
            "snr": 17,
            "status": "tracking",
            "azimuth": 89,
            "elevation": 7
        },
        {
            "prn": 23,
            "snr": 15,
            "status": "tracking",
            "azimuth": 287,
            "elevation": 37
        },
        {
            "prn": 24,
            "snr": null,
            "status": "in view",
            "azimuth": 154,
            "elevation": 24
        },
        {
            "prn": 27,
            "snr": null,
            "status": "in view",
            "azimuth": 329,
            "elevation": 3
        },
        {
            "prn": 29,
            "snr": null,
            "status": "in view",
            "azimuth": 210,
            "elevation": 34
        },
        {
            "prn": 30,
            "snr": 16,
            "status": "tracking",
            "azimuth": 35,
            "elevation": 5
        }
    ]
}
You can quit MySQl Shell by using the \q command.
Wrap-up
The numerous modules available for microcontrollers such as Raspberry Pi make it possible to capture multiple data types - such as GPS location data. By leveraging programming languages such as Node, we can quickly and easily capture that data and store it as JSON using MySQL Document Store.
Photo by Jamie Street on Unsplash
