Connecting to a MySQL HeatWave Database Instance Using OpenVPN
MySQL MySQL Database Service Oracle Cloud Infrastructure

MySQL HeatWave Database is a fully managed service on Oracle Cloud Infrastructure (OCI) that is developed, managed, and supported by the MySQL team at Oracle. When you provision a new MySQL instance under OCI, you can only connect to the database from inside the OCI network. While this is a great security feature for production services hosted in OCI, it is more challenging to share a development database among developers. In this post, we will show how you can use OpenVPN, running on an OCI Compute instance, to access a MySQL HeatWave Database instance.
There are several ways you can connect to a MySQL HeatWave Database instance from outside OCI. These include:
- Connect to a Compute instance in OCI and then connect to the MySQL instance.
- A VPN server that bridges your local network with the OCI virtual cloud network (VCN)
- A bastion session
- A network load balancer in OCI
In this post, we will talk about the second option, using OpenVPN to connect to OCI and a MySQL HeatWave instance. One advantage this method has over others is that we can reuse the VPN connection to manage multiple MySQL instances. There are quite a few steps involved, but there is nothing too complex in any of them. The best part is that most of these steps are ‘one and done’ - where we do not need to repeat them if we add a new database instance to the same VCN.
The Prep Work
There are a few things we will need before we get started on this tutorial.
- An OCI user account
- MySQL Shell installed on your local machine.
Set Up a VCN
We are first going to create a new Virtual Cloud Network (VCN). This new VCN will make it easier to configure our connections and avoid contradicting rules.
Create a new VCN
Login to OCI and click the ‘hamburger’ menu.

In the search box that appears, type vcn and click the link for ‘Virtual cloud networks’.

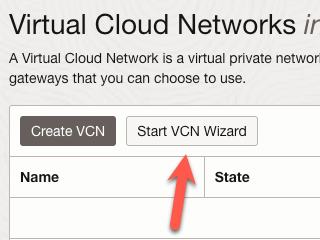
On the main ‘Virtual Cloud Network’ page, click the ‘Start VCN Wizard’ button.
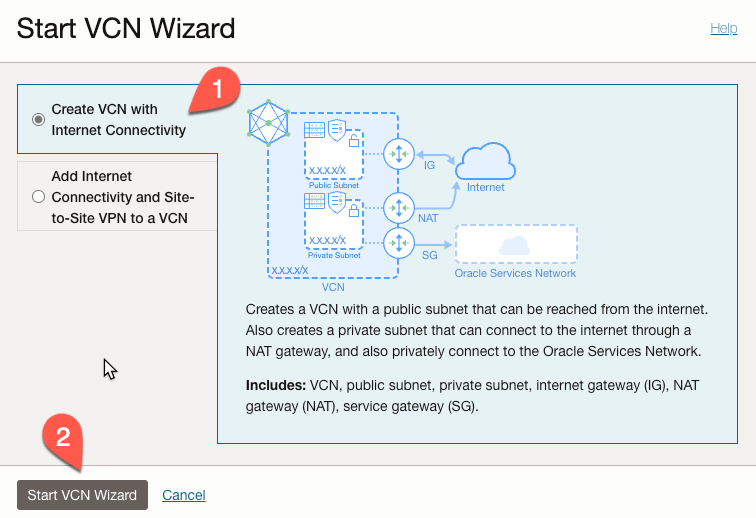
Next, select the ‘Create VCN with Internet Connectivity’ option (1) and then click the ‘Start VCN Wizard’ button (2).
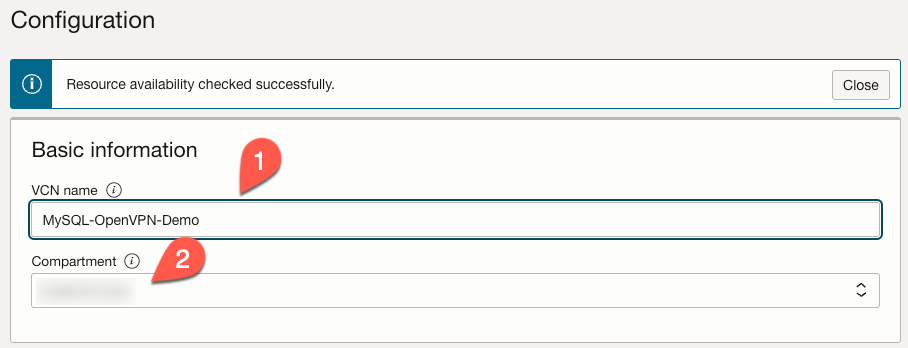
In the ‘Basic Information’ section, give the new VCN a name (1) and choose which OCI compartment it will reside in (2).
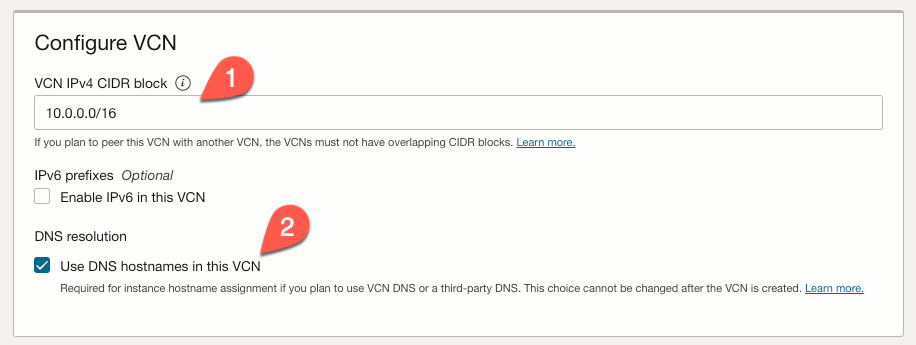
For the ‘Configure VCN’, add the IPv4 CIDR block 10.0.0.0/16 (1) and select the ‘Use DNS hostnames in this VCN’ checkbox (2).
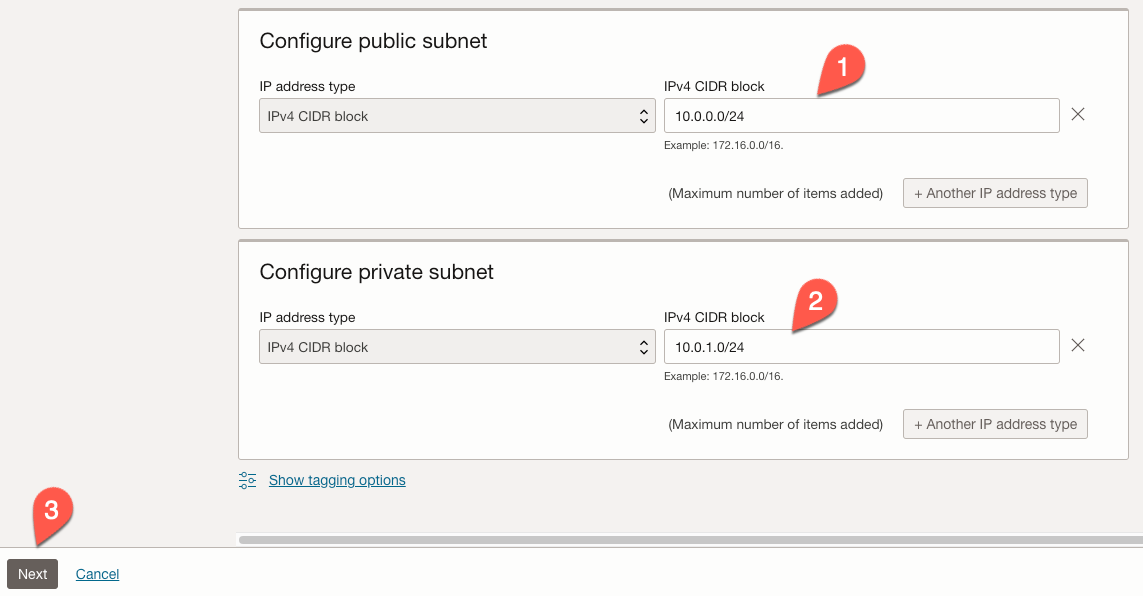
Under the ‘Configure public subnet’ section, set the CIDR block to 10.0.0.0/24 (1). In the ‘Configure private subnet’ section, set the CIDR block to 10.0.0.1.0/24 (2). Then, click the ‘Next’ button (3).
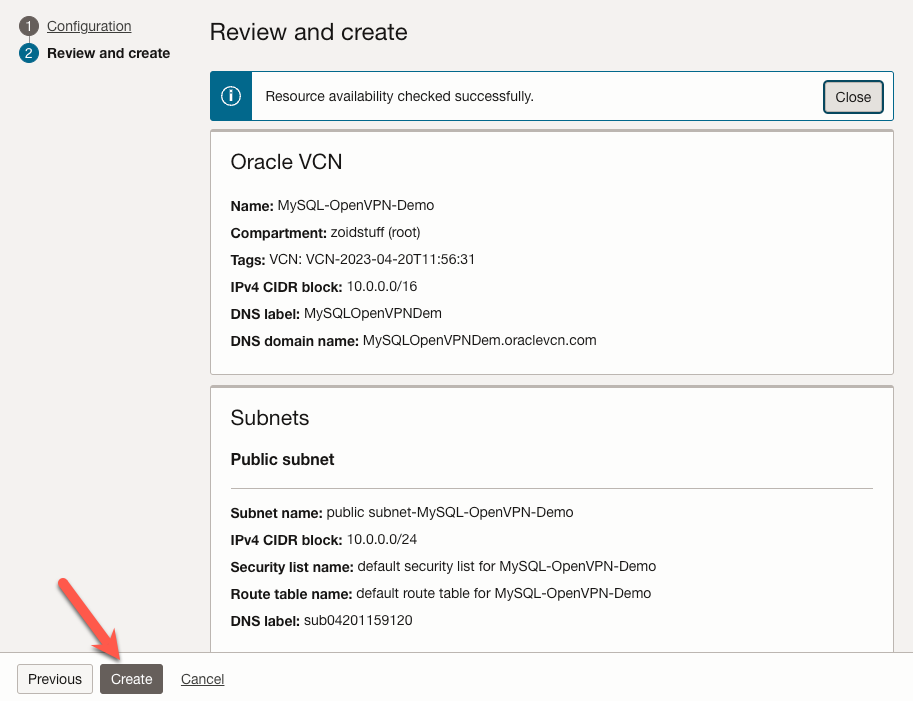
Review the settings on the next screen and click the ‘Create’ button.
When the wizard is done setting up our new VCN, we will see a screen similar to the image below. Next, click the ‘View VCN’ button.

Configure the VCN
Now that we have our new VCN, we will configure ingress rules in our private and public subnets to allow MySQL and OpenVPN communication, respectively.
Private Subnet
Click the link for the private subnet.

On the details page for the private subnet, click the link to the default security list.

Next, click the ‘Add Ingress Rules’ button.

In the ‘Add Ingress Rules’ form, make sure the values are as follows:
- Set the ‘Source CIDR’ to
10.0.0.0/16(1). - The ‘IP Protocol’ should be set to
TCP(2). - The ‘Destination Port Range’ should be set to
3306,33060(3).- Port
3306is the default port for MySQL. - Port
33060is used by the X-Protocol to manage instances and access to MySQL Document Store.
- Port
- Add an optional description (4).
- Click the ‘Add Ingress Rules’ button (5) to create our new rules.

Public Subnet
Now, we need to create rules for OpenVPN in our public subnet. Near the top of the page, click the link that is the name of the new subnet. In this case, it is ‘MySQL-OpenVPN-Demo’.

We should now see all the security lists for our VCN. Click the link for the public subnet. The link in this demo is named ‘Default Security List for MySQL-OpenVPN-Demo’.

Click the ‘Add Ingress Rules’ button.

In the ‘Add Ingress Rules’ form, make sure the values are as follows:
- Set the ‘Source CIDR’ to
0.0.0.0/0(1).- Alternatively, you can specify a single IP address or a range of addresses.
- The ‘IP Protocol’ should be set to
TCP(2). - The ‘Destination Port Range’ should be set to
943,443(3). - Add an optional description (4).
- Click the ‘Add Ingress Rules’ button (5) to create our new rules.

For now, we are done with the VCN. Once we get our Compute instance with OpenVPN provisioned, we will need some more configuration.
Provision Database Instance
The next step is to provision a MySQL HeatWave instance. Click on the ‘hamburger’ menu in the top left corner.

In the search box that appears, type mysql and then click the link for MySQL ‘Db Systems’.

Click the ‘Create DB System’ button on the main page for ‘DB Systems’.

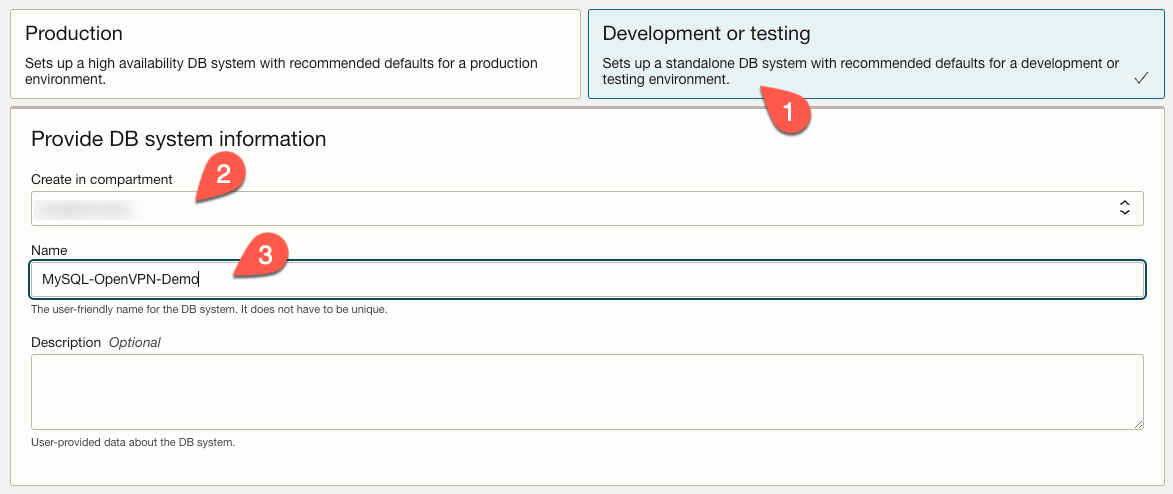
For this example, we will choose the “Development and Testing” option (1). We need to specify what compartment the database instance will reside in (2). We also need to provide a name for our instance (3).
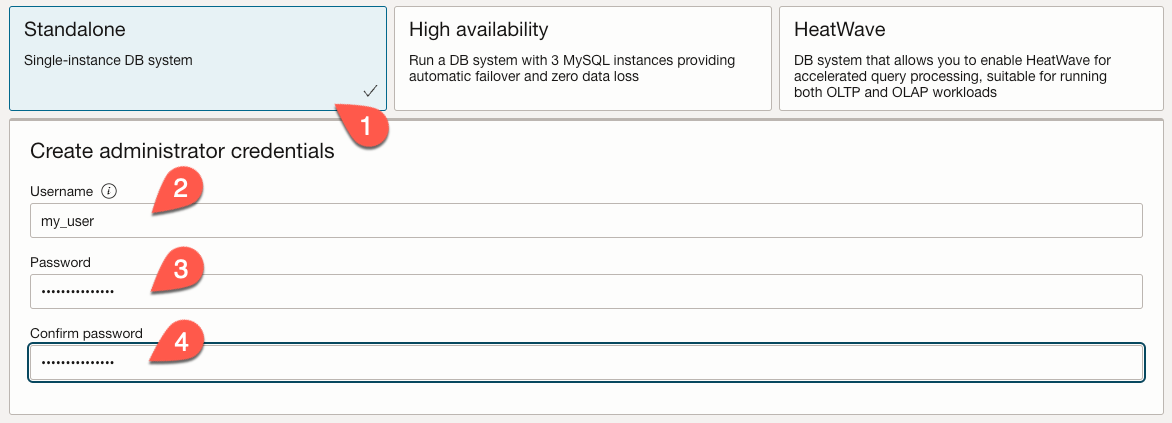
Next, we choose ‘Standalone’ (1) and specify the administrator credentials. This user is the equivalent of the root user. We provide a username (2), a password (3), and we confirm the password (4).
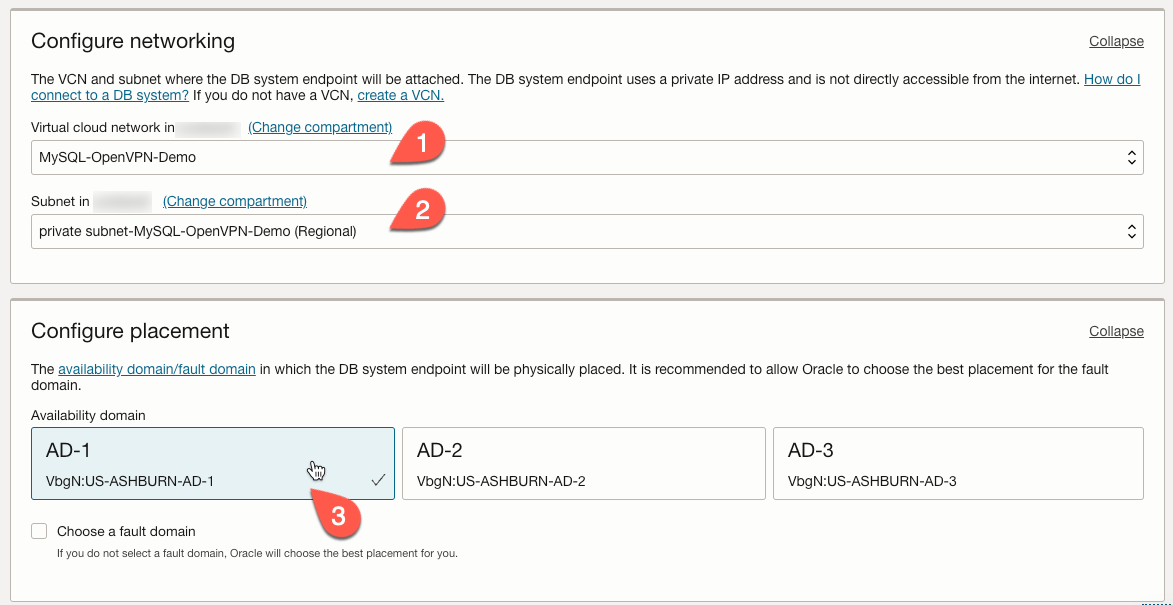
Under the ‘Configuring networking’ section, we will choose the VCN we created earlier (1) and the private subnet for that VCN (2). We also select an availability domain (AD). In this example, we choose ‘AD-1’ (3).
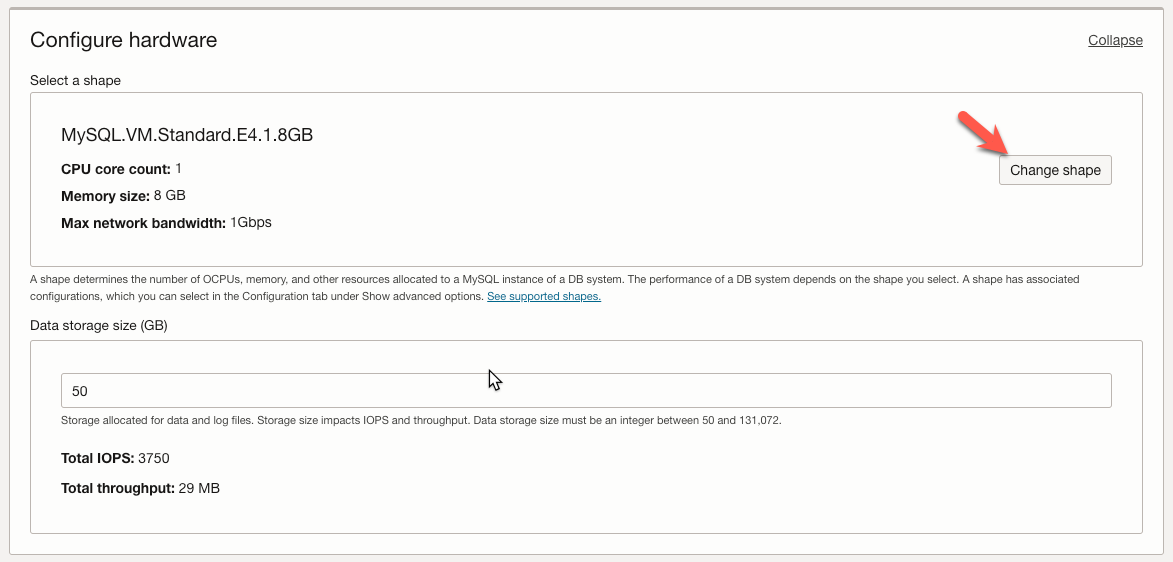
If you want to choose a different shape for our database instance, click the ‘Change Shape’ button in the ‘Configure hardware’ section.
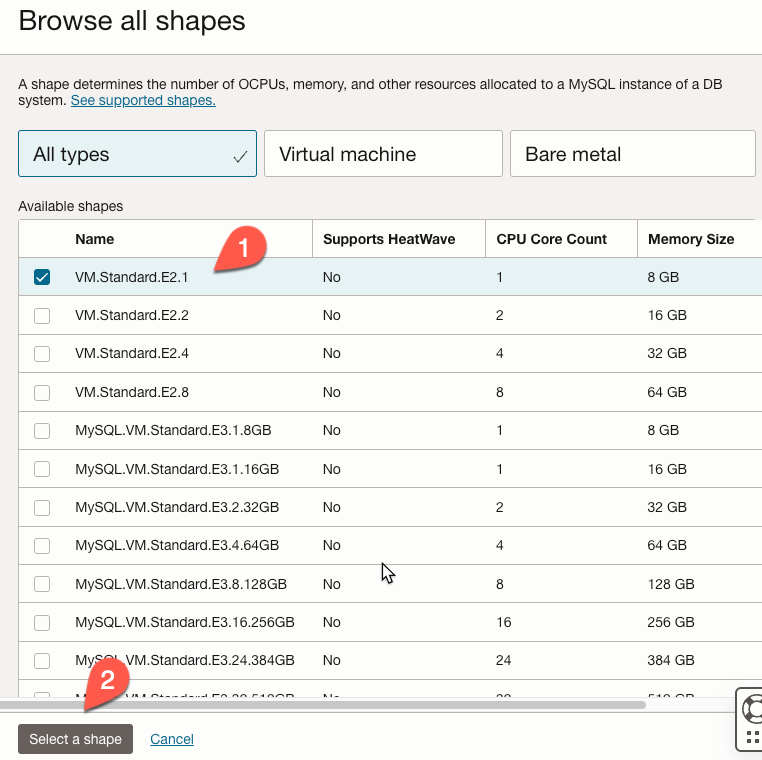
In the ‘Browse All Shapes’ window, we select ‘VM.Standard.E2.1’ (1), one of the smaller shapes we can use for a MySQL HeatWave instance. We then click the ‘Select a shape’ button.
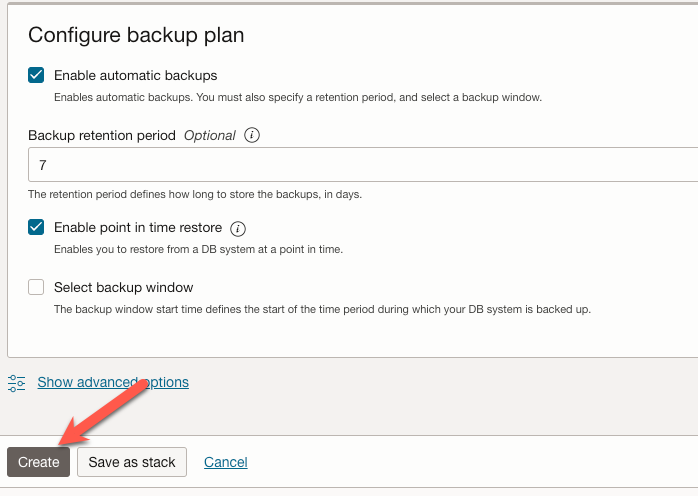
We can accept the default values for the remaining sections and click the ‘Create’ button.
It may take a while for the instance to be provisioned. It might be a good time to take a break. Once the instance is up and running, note the IP address; we will need this later.
Set up OpenVPN Server
To set up a Compute instance with OpenVPN, we first need to head over to the OpenVPN page at the Marketplace.
Provision Compute Instance
Once we are on the OpenVPN Marketplace page, specify a compartment where the instance will live (1) and then click ‘Launch Instance’ (2) to start the process.

In the ‘Create compute instance’ form, give the instance a name (1) and verify the correct compartment (2). We can choose whatever availability domain (AD) we want, but if we use an ‘Always Free’ shape, we will usually find those in AD 3 (3).

Under the ‘Image and Shape’ section, you can leave the defaults, but if we want to use an ‘Always Free’ shape, we click the ‘Change Shape’ Button.

In the ‘Browse all shapes’ window, select ‘Virtual Machine’ (1). To find an ‘Always Free’ shape, select the ‘SSpecialty and previous generation’ (2) shape series. We should see a list of shapes; the first should have an ‘Always Free-eligible’ label. Click the checkbox next to this shape (3). Click the ‘Select Shape’ button (4).

Back on the ‘Create compute instance’ page, under the ‘Networking’ section, choose the VCN we created earlier (1). We also want to choose the public subnet (2).

Under the ‘Add SSH keys’ section, choose how you will handle SSH keys for connecting to our instance. In this case, I use a public key for an SSH key pair I have already created. Choose whatever option is the best fit for your situation.

We can accept the default values for the remaining sections and click the ‘Create’ button.

Once the Compute instance is active, we need to make a configuration change to the Virtual NIC (VNIC) that will allow us to set up a route for the VNC. Scroll down to the ‘Attached VNICs’ link.

In the ‘Attached VNICs’ section, click the three vertical dots on the right side (1) and then click ‘Edit VNIC’ (2).

When the ‘Edit VNIC’ form opens, select the ‘Skip source/destination check’ checkbox (1) and click the ‘Save changes’ button.

Back to the VCN
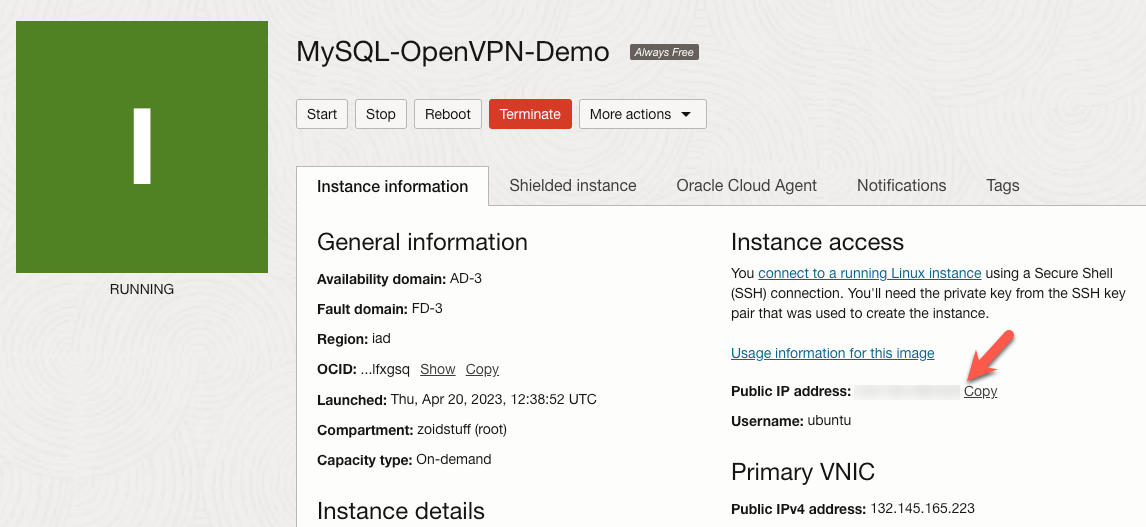
Now that we have our OpenVPN compute instance, let’s finish the configuration on our VCN. On the main page for our instance, look for the section titled ‘Primary VNIC’ and note the ‘Private IPv4 address’. We also need to take note of the public IP address. We will need that shortly.

Navigate back to the main page for our VCN and scroll down to the ‘Resources’ section in the left sidebar and click ‘Route Tables’.

Click the link for the route table for the private subnet.

Once on the Route Table page, we will click the ‘Add Route Rules’ button.

In the ‘Add Route Rules’ form, we can ignore the warning (1) at the top, as we have already taken care of that for our compute instance. Complete the rest of the form as follows:
- For ‘Target type’, select ‘Private IP’ (2).
- Choose ‘CIDR Block’ for the destination type (3).
- Set the destination CIDR Block as
172.27.232.0/24(4).- We will learn about where this comes from in a bit.
- Set the ‘Target selection’ to the private IP address of the OpenVPN Compute instance (5).
- In this case, it is
10.0.0.38.
- In this case, it is
- Provide an optional description (6).
- Click ‘Add Route Rules’

Configure OpenVPN
We now need to set up the OpenVPN server. The setup includes using SSH to connect to the server and then the OpenVPN web interface.
SSH Into the Server
To connect to the server over SSH, open a command window and use a command similar to:
ssh openvpnas@{public IP address} -i {path to private key}
In this example, the {public IP address} would be the public IP address for the Compute instance we just created, and the {path to private key} is where the private key we used for the instance is stored.
Once connected to the server, we will be prompted to complete the server setup.
First, we need to accept the license agreement. Type yes and press enter.

Next, we specify this will be the ‘primary Access Server’ node by typing yes and pressing enter.

We want the web UI to be used by all the network interfaces, so we type 1 and press enter.

We can accept the default value for the algorithm to use for OpenVPN. For example, enter rsa and press enter.

Specify the certificate’s key size to be 2048 and press enter.

We can accept the default value for the algorithm to use for the self-signed certificates. For example, enter rsa and press enter.

Specify the key size for the certificates to be 2048 and press enter.

We need to specify what port to use for the web UI, so we enter 943 and press enter. This port is one of the ports we opened earlier on our public subnet.

Now, we need to specify the port for the OpenVPN Daemon. Enter 443 and then press enter. This port is the other port we opened on the public subnet.

We want to have client traffic routed through the VPN by default, so we type yes and press enter.

We need private subnets to be accessible to clients, so we type yes and press enter.

We enable the option to log in to the web interface as ‘openvpn’ by typing yes and pressing enter.

Next, we will enter the password and confirm the password for the ‘openvpn’ account.

If we have an OpenVPN activation key, we can enter it or press enter to continue.

The server will go through the process of setting up the server. When it is complete, we will see something like this:

We can close the command window.
OpenVPN Web UI
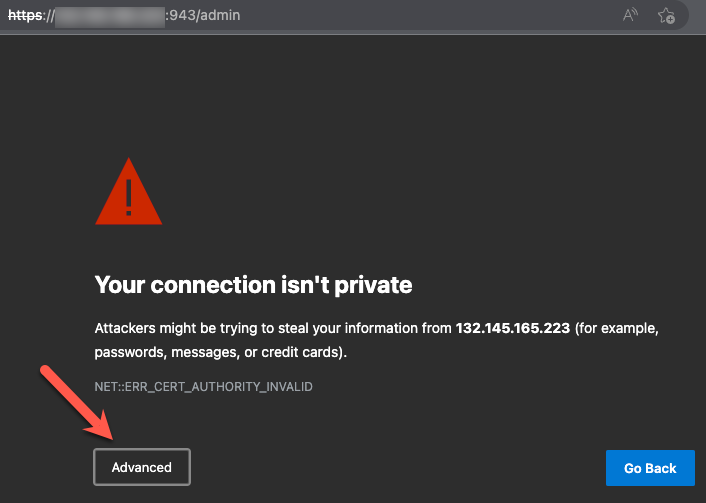
To access the OpenVPN Web UI to finish the configuration, open a web browser and go to: https://{public IP address}:943/admin. You should see a warning about the connection not being private. This warning is expected because of the self-signed certificate that was created. We can continue in Chromium-based browsers by clicking the ‘Advanced’ button.
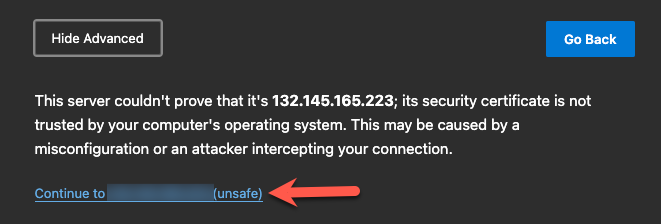
We then click the ‘Continue to…’ link.
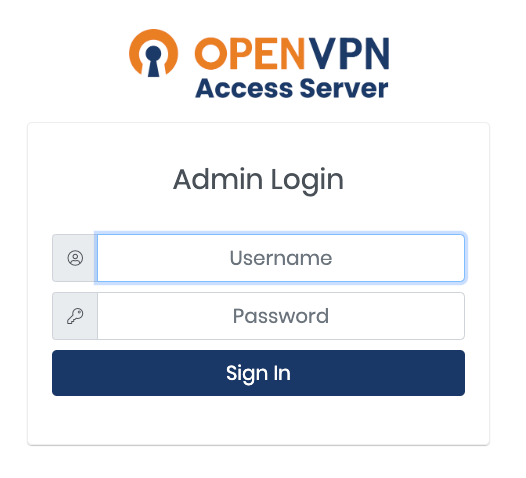
Once we get past the browser security, we should see the login page for OpenVPN. The username should be openvpn, and the password should be what you provided in the previous section.
After logging in, we need to agree to the terms of use. We are then brought to the main page of the web UI. In the left menu, click the ‘Network Settings’ link under ‘Configuration’.
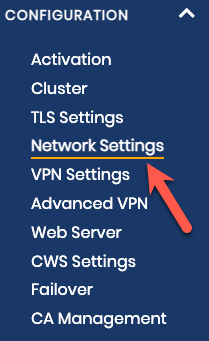
In the ‘VPN Server’ section of the ‘Network Settings’ page, we enter the public IP address of our OpenVPN Compute instance. Alternatively, if you set up a DNS entry for the public IP address, you can enter that domain address here.

Scroll to the bottom of the page and click ‘Save Settings’.

After saving the page, we will see a message at the top of the page telling us that we need to propagate the changes to the running server. Click the ‘Update Running Server’ button.
Note: After updating the ‘hostname or IP address’ field, you may need to manually refresh the page and log in again.

In the left sidebar, click the ‘VPN Settings’ link under ‘Configuration’.
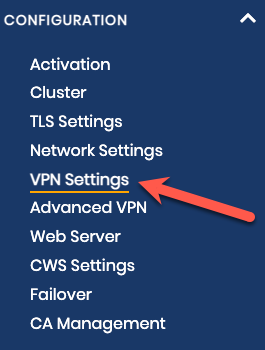
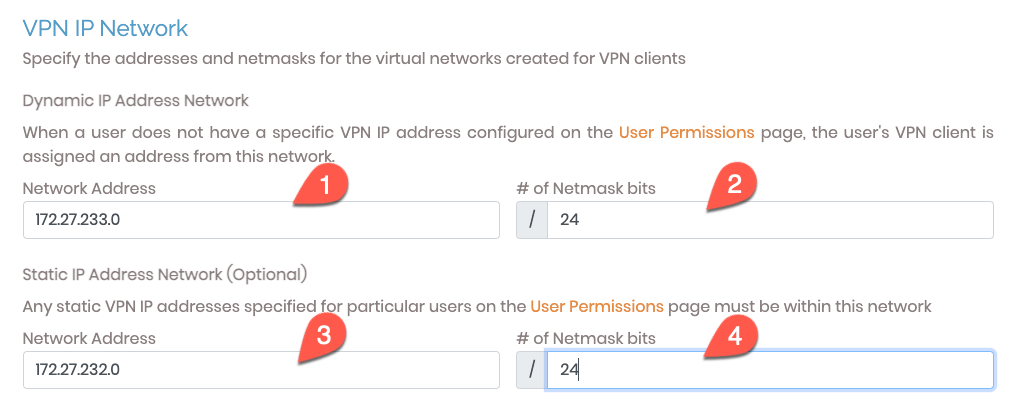
In the ‘VPN IP Network’ section, we set the following values:
- The ‘Network Address’ field for ‘Dynamic IP Address Network’ should be updated to be
172.27.233.0(1) - The ‘# of Netmask Bits’ field for ‘Dynamic IP Address Network’ should be set to
24(2) - The ‘Network Address’ field for ‘Static IP Address Network’ should be updated to be
172.27.232.0(3) - The ‘# of Netmask Bits’ field for ‘Static IP Address Network’ should be set to
24(4)
In the ‘Routing’ section, we choose the ‘Yes, using routing’ option (1), and then we add the private subnets 10.0.0.0/24 and 10.0.1.0/24 (2).

If we want to be able to connect to other resources on the internet while connected to the VPN, under the ‘DNS Settings’ section, we will make the following changes.
- Set the option for ‘Have clients use specific DNS servers’ to ‘Yes’ by clicking on it (1).
- Set the ‘Primary DNS Server’ to your DNS IP address (2). In this example, we use
1.1.1.1. - Set the ‘Secondary DNS Server’ to your DNS IP address (3). In this example, we use
1.0.0.1.

Scroll to the bottom of the page and click ‘Save Settings’. When the settings are saved, make sure to update the running server.

In the left sidebar, click the ‘User Permissions’ link under ‘User Management’.
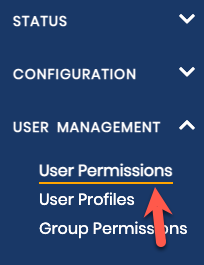
On the ‘User Permissions’ page, we need to create a new user. We accomplish this by doing the following:
- Provide a username for our new user (1)
- Optionally, set the user to be logged in automatically by allowing the OpenVPN client to import the profile (2).
- Click the ‘More Settings’ icon for the new user (3).
- Provide a password for the user (4).
- Change the ‘IP addressing’ option to ‘Use Static’ (5).
- Set the ‘VPN Static Ip Address’ to
172.27.232.134(6). - Change the ‘Addressing method’ to ‘Use Routing’ (7).
- Set the ‘Allow access to these networks’ field to
10.0.0.0/24and10.0.1.0/24(8). - Ensure the ‘All server-side private subnets’ checkbox (9) is checked.
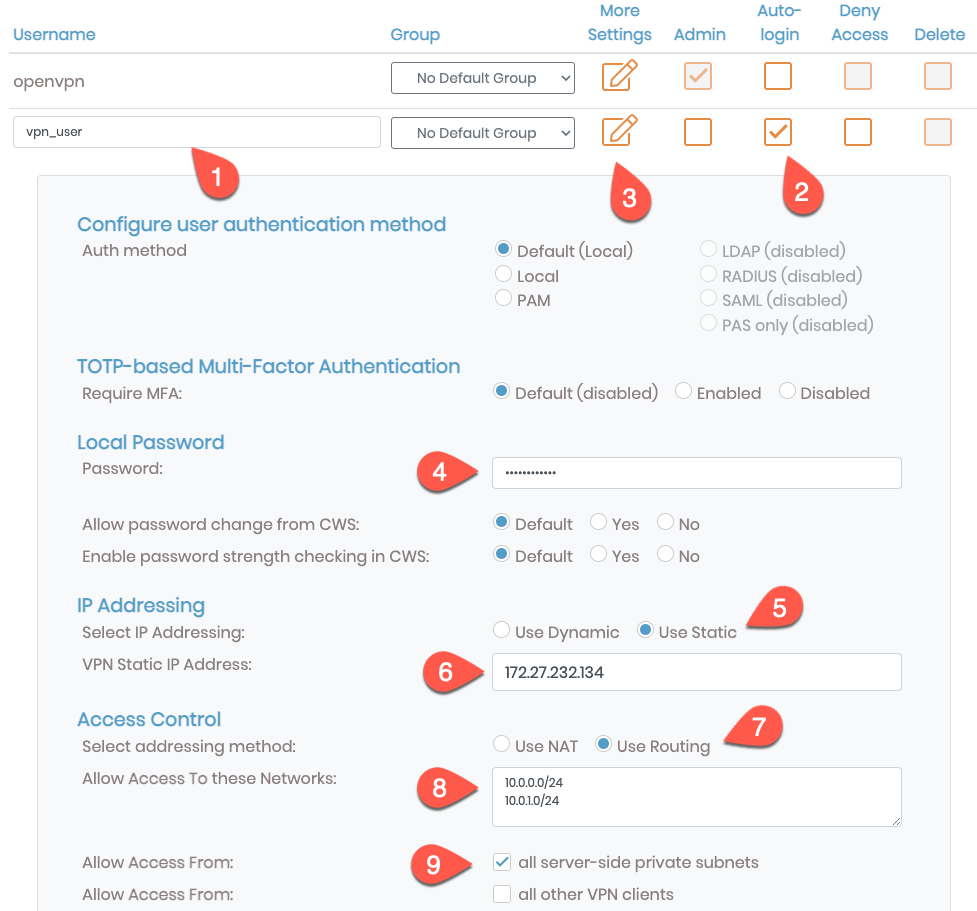
Scroll to the bottom of the page, click ‘Save Settings’, and ensure you update the running server.
We are now finished with setting up and configuring the OIC components. We still have a little work left, though.
Set Up OpenVPN Client
We are in the homestretch.
The next step is to download and install the OpenVPN Connect client. The OpenVPN Connect client is available for Windows, Mac OS, and Linux.
Once we have the client installed, we want to run it. With the client open, we want to add a profile by cling the ‘+’ icon. Note: Depending on your operating system, the UI may be slightly different.
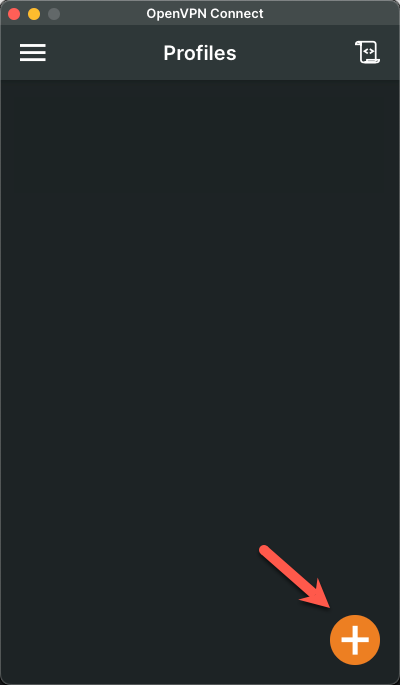
Next, we want to enter the IP address (or domain name if you configured one) (1) for our OpenVPN server and then click the ‘Next’ button (2).

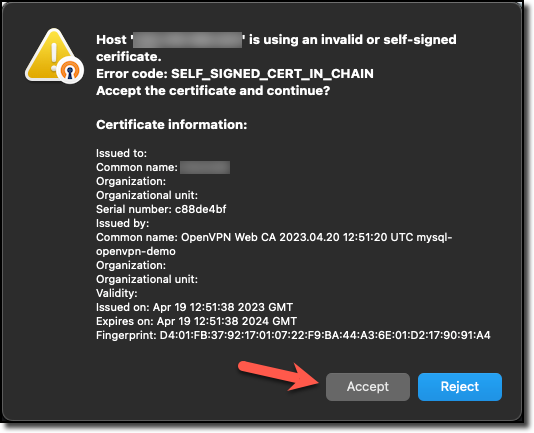
We may see a pop-up window similar to the one below. We want to click ‘Accept’.
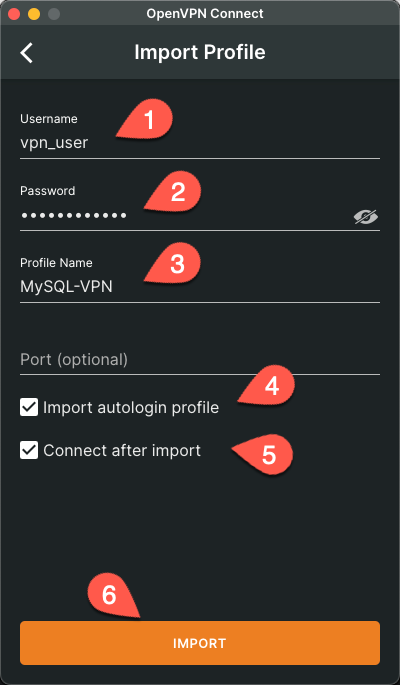
On the next screen, we need to do the following:
- Enter the username for the user we create in the Web UI (1).
- Enter the password for this user (2).
- Optionally, set a profile name (3).
- Check the ‘Import autologin profile’ checkbox (4).
- Check the ‘Connect after import’ checkbox (5).
- Click the ‘Import’ button.
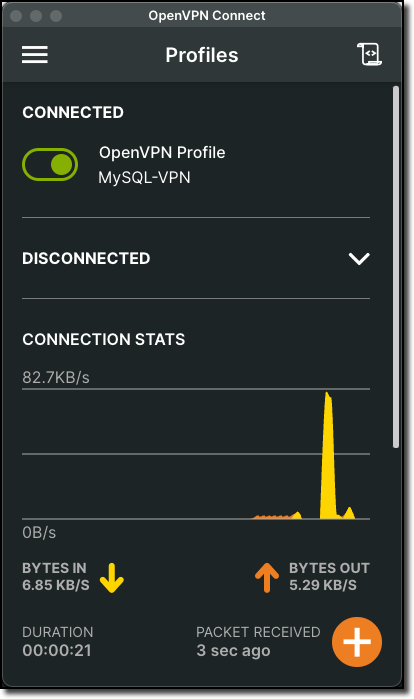
After a short while, we will be connected to the VPN. At that time, we will see something similar to this image:
Connecting to the Database
We are in the homestretch. The only thing we have left to do is connect to the database. We are going to use MySQL Shell to make that connection.
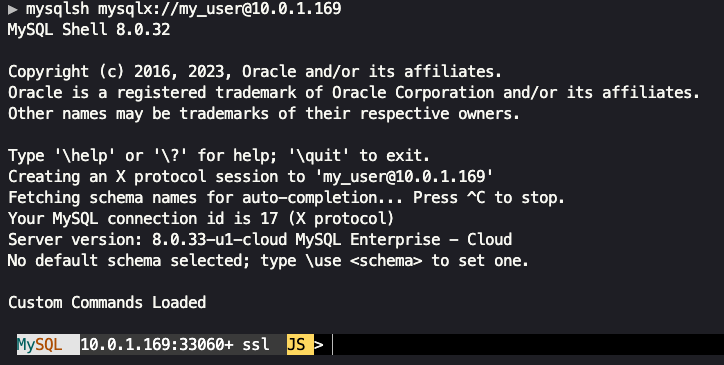
Open a command or terminal window and enter the following command:
mysqlsh mysqlx://{db user}@{db private IP address}
Where {db user} is the user we created when we provisioned the MySQL HeatWave instance, and {db private Ip address} is the private IP address for our database instance.
We will be prompted to enter the password for the database user. When successful, we can have MySQL Shell store the password. After logging in, we should see a response similar to the image below.
Congratulations, you made it!! Thanks for sticking with it.
The Wrap-Up
Of all the ways to connect to a MySQL HeatWave database instance from outside OCI, using a VPN connection is, by far, the most versatile. Yes, there were a lot of steps involved in this process, but most of them can be considered ‘one and done’. If we need to add a new database instance, as long as it is added to the same VCN and subnet, there is nothing else we need to do to connect. We can use the same OpenVPN server and client to connect to the new database instance. Even if we created a new VCN, we could still use the same OpenVPN connection by adding new route rules.
Photo by Privecstasy on Unsplash

